Binding Servos
Tell Snakie which servo pin drives which joint and how servo angles map to joint angles
By Kevin McAleer, 5 Minutes
Page last updated November 21, 2026

Joining the model to the electronics
So far the arm lives entirely on screen. A real arm has a servo at each joint, and each servo is plugged into a pin on the microcontroller. Binding tells Snakie which pin drives which joint.
Once that’s done, two things work:
- Code that moves a servo on a pin moves the matching joint in the 3-D view
- Snakie can turn your motions into servo code
Bind a servo by hand
In the Build panel on the left, find Servos and click + Bind a servo by hand. A small panel opens, titled Servo — GP0.
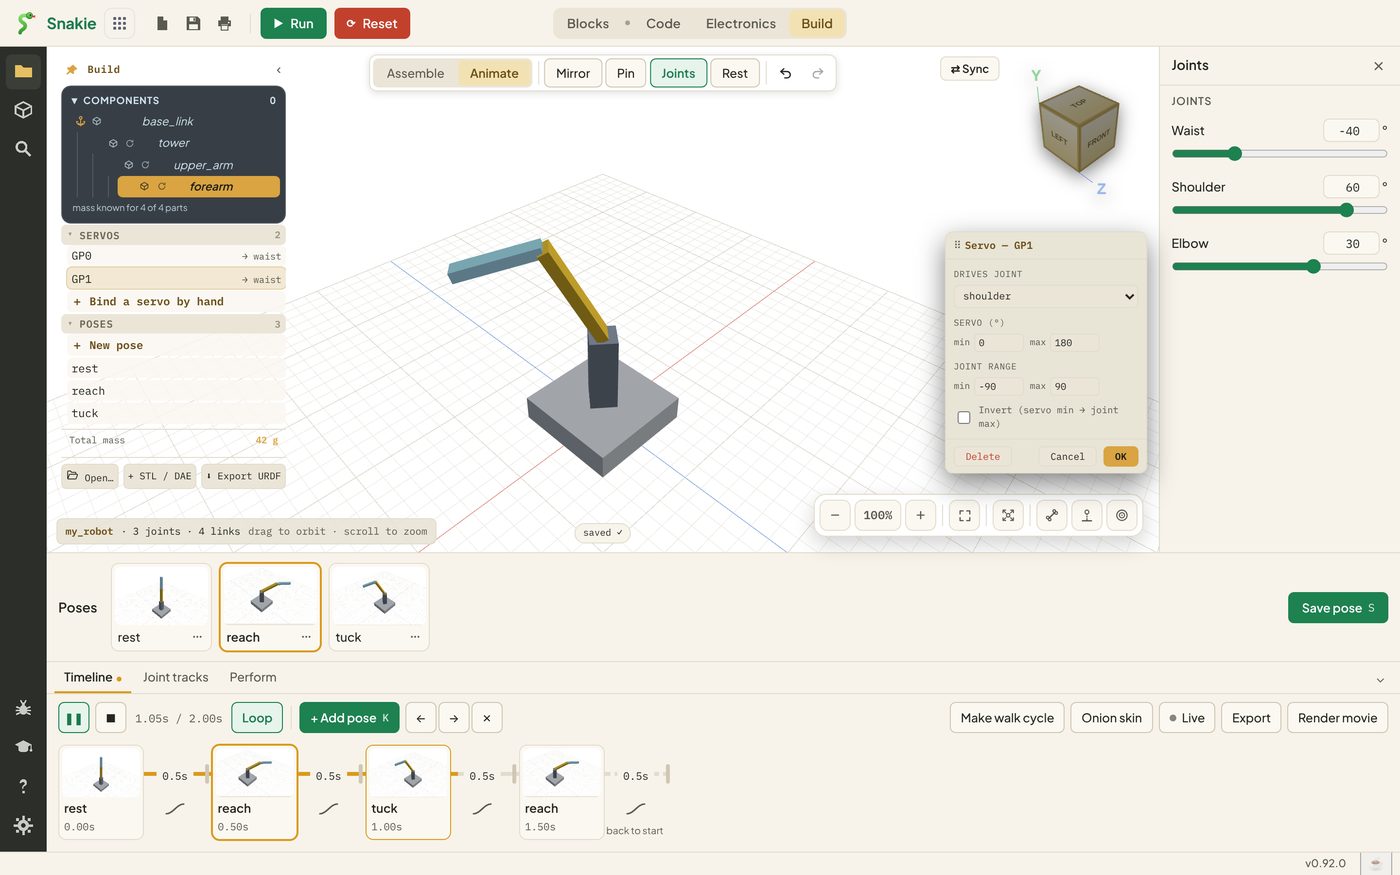
- Under Drives joint, choose
waist - Click OK
Do it twice more. Snakie hands out the next pin each time, so choose shoulder for GP1 and elbow for GP2.
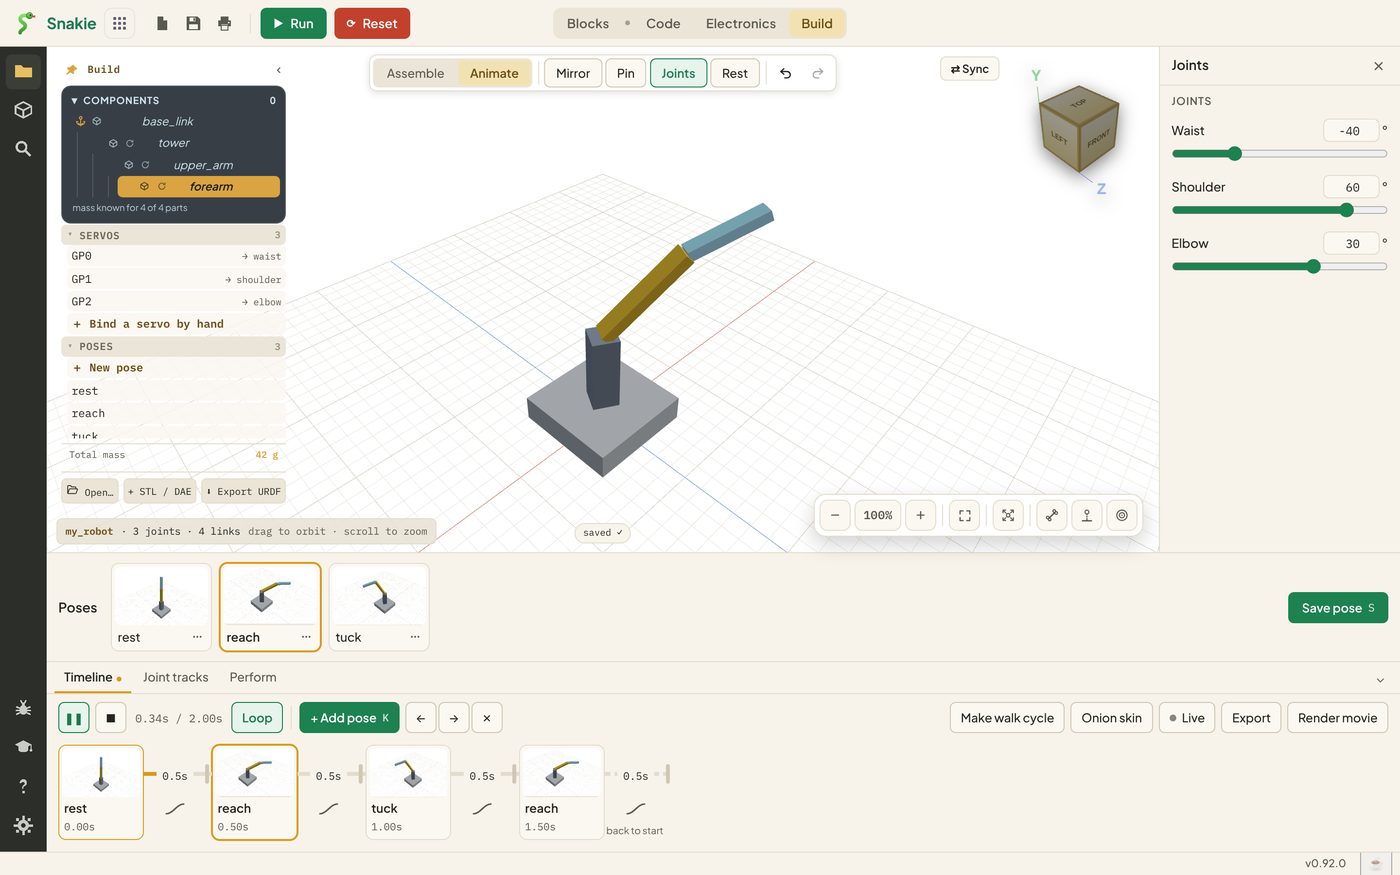
The Servos list now reads GP0 → waist, GP1 → shoulder, GP2 → elbow. Click a row to open it again.
Servo angles and joint angles
Here’s a wrinkle every robot builder meets. Your joints run from -90 to 90, with zero in the middle. A hobby servo runs from 0 to 180, with 90 in the middle. They’re two rulers for the same movement.
The binding panel holds both ends of each ruler:
| Setting | Default | Meaning |
|---|---|---|
| Servo min / max | 0 / 180 | The servo’s range, in servo degrees |
| Joint range min / max | -90 / 90 | The joint angles those two ends match |
Snakie slides one ruler along the other:
| Joint angle | Servo angle |
|---|---|
| -90 | 0 |
| -40 | 50 |
| 0 | 90 |
| 50 | 140 |
| 90 | 180 |
So with the defaults, servo angle = joint angle + 90. Rest is every servo at 90.
Invert
Servos are often mounted facing the opposite way to the joint in your model. The arm then goes up when you asked for down.
Tick Invert and Snakie flips the ruler: servo min matches joint max. You fix it once here and never think about it in your code.
You’ll only know whether you need it once the real servo is fitted, so come back to this box on build day.
The other way: wire them in Electronics
Binding by hand is quick, and perfect for the simulator. If you’re building the real robot, there’s a tidier route.
- In the Electronics workspace, add your servos from the parts list and wire each signal pin to a GPIO, as you learned in Wire It Up - Electronics in Snakie
- Back in Build, each servo appears in the Servos list with its pin and a menu of joints
- Pick the joint for each one
A servo with no signal wire shows as unwired until you connect it. The Sync button at the top of the 3-D view tells you whether Electronics and Build agree.
Now your wiring diagram, your 3-D model and your code all describe the same robot.
Where bindings live
They’re in robot.yml too:
  servoJointMap:
    - pin: "1"
      joint: shoulder
      jointMin: -90
      jointMax: 90
      servoMin: 0
      servoMax: 180
Try it Yourself
- Bind GP0, GP1 and GP2 to waist, shoulder and elbow
- Open
robot.ymland findservoJointMap - Work it out by hand: what servo angle puts the elbow at -80? (Check: it should be 10)
- Open the elbow’s binding, tick Invert, look at what changes, then untick it
Common Issues
Problem: A new binding says it drives waist when I wanted another joint.
Solution: Change Drives joint before clicking OK.
Why: New bindings start on the first joint in the list.
Problem: My real servo buzzes at one end of its travel. Solution: Narrow Servo min / max, for example 10 to 170. Why: Many cheap servos can’t quite reach 0 or 180.
Problem: The real joint moves the opposite way to the model. Solution: Tick Invert on that servo. Why: The servo is mounted the other way round.
Check your understanding
Quick quiz 1 of 3
What does binding a servo do?
Quick quiz 2 of 3
With the default settings, which servo angle is the rest position?
Quick quiz 3 of 3
A real joint moves the wrong way. What’s the fix?
You can use the arrows ← → on your keyboard to navigate between lessons.
Comments