Racks, Pulleys and Belts
Turn rotation into straight-line motion with a rack, and drive across a distance with GT2 pulleys and a stock belt, in BetterCad
By Kevin McAleer, 6 Minutes
Page last updated November 21, 2026

Spur gears turn one spin into another spin, close by. Two more forms of the Gear tool cover the other jobs a robot needs: moving something in a straight line, and carrying a turn across a gap.
Racks: turning into sliding
A rack is a gear unrolled flat. Turn the gear and the rack slides. It’s how a gripper’s jaws open, how a steering link moves, and how a small linear actuator works.
- Start a new model and make a 16 tooth gear. Press Enter.
- In the Browser, right-click the gear and choose Add rack.
- Set Length to
60.
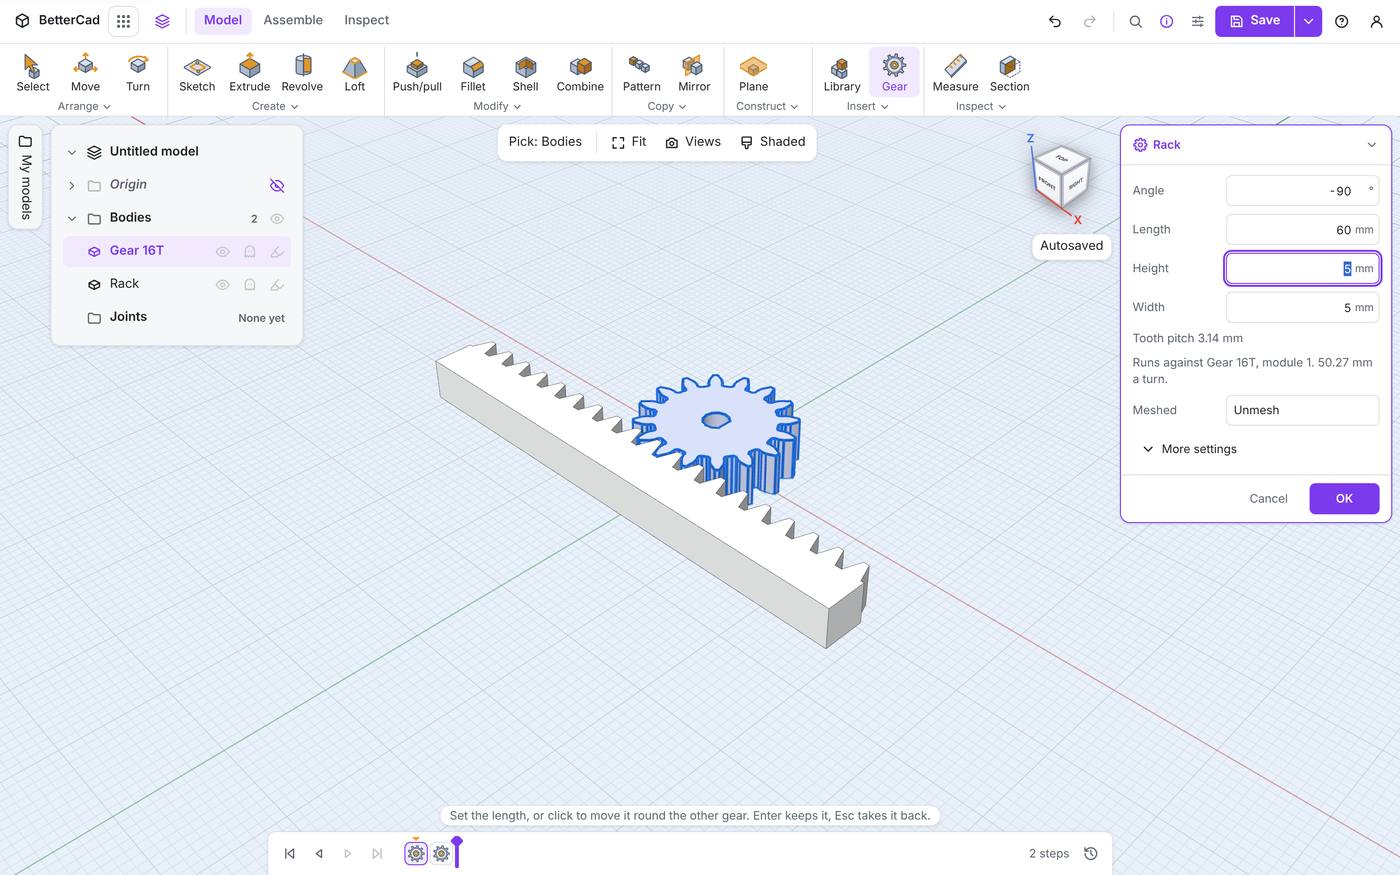
The rack arrives already meshed, its teeth sitting in the gear’s gaps.
| Setting | Starts at | What it is |
|---|---|---|
| Angle | -90° | Which side of the gear the rack runs along |
| Length | 40 mm | How long the rack is |
| Height | 5 mm | The solid bar under the teeth |
| Width | 5 mm | The thickness, to match the gear |
Two lines under the boxes do the sums for you. Tooth pitch 3.14 mm is the distance from one tooth to the next. And “Runs against Gear 16T, module 1. 50.27 mm a turn” tells you how far the rack travels for one full turn of the gear.
That last number is the one you design with:
import math

module = 1
teeth = 16

travel_per_turn = math.pi * module * teeth    # 50.27 mm

# A servo only turns half way, so:
servo_sweep = 180
travel = travel_per_turn * servo_sweep / 360  # about 25 mm of slide
Need more travel from the same servo? Use a gear with more teeth. Need more push? Use fewer.
A rack follows its gear just as a mating gear does, and has the same Unmesh button. You can also make a rack on its own: start the Gear tool and switch Form to Rack.
Pulleys: turning at a distance
Gears have to touch. When the motor is here and the wheel is over there, use a belt.
GT2 is the toothed belt used on nearly every hobby 3D printer, so belts and bought pulleys are cheap and easy to find. Its teeth are 2 mm apart.
- Start a new model. Click Gear, click the ground, and switch Form to GT2 pulley.
| Setting | Starts at | What it is |
|---|---|---|
| Teeth | 20 | How many belt teeth fit round it |
| Belt width | 6 mm belt | 6 mm or 9 mm. The pulley is made 1 mm wider than the belt |
| Flanges | On | Thin discs top and bottom that stop the belt wandering off |
| Bore | Round, 5 mm | The same four choices as a gear |
The panel shows Pitch diameter 12.73 mm for 20 teeth.
- Press Enter. Make a second pulley somewhere nearby with 40 teeth.
Fit a belt
Belts come in fixed lengths. You can’t buy a 137 mm one. So instead of choosing a distance and hoping, let BetterCad choose a real belt and set the distance to suit.
- Select both pulleys.
- Right-click one and choose Fit a belt.
The newer pulley slides along the line between them until a stock belt fits exactly. Now edit it to see what was chosen: right-click Pulley 40T’s step on the timeline and choose Edit gear.
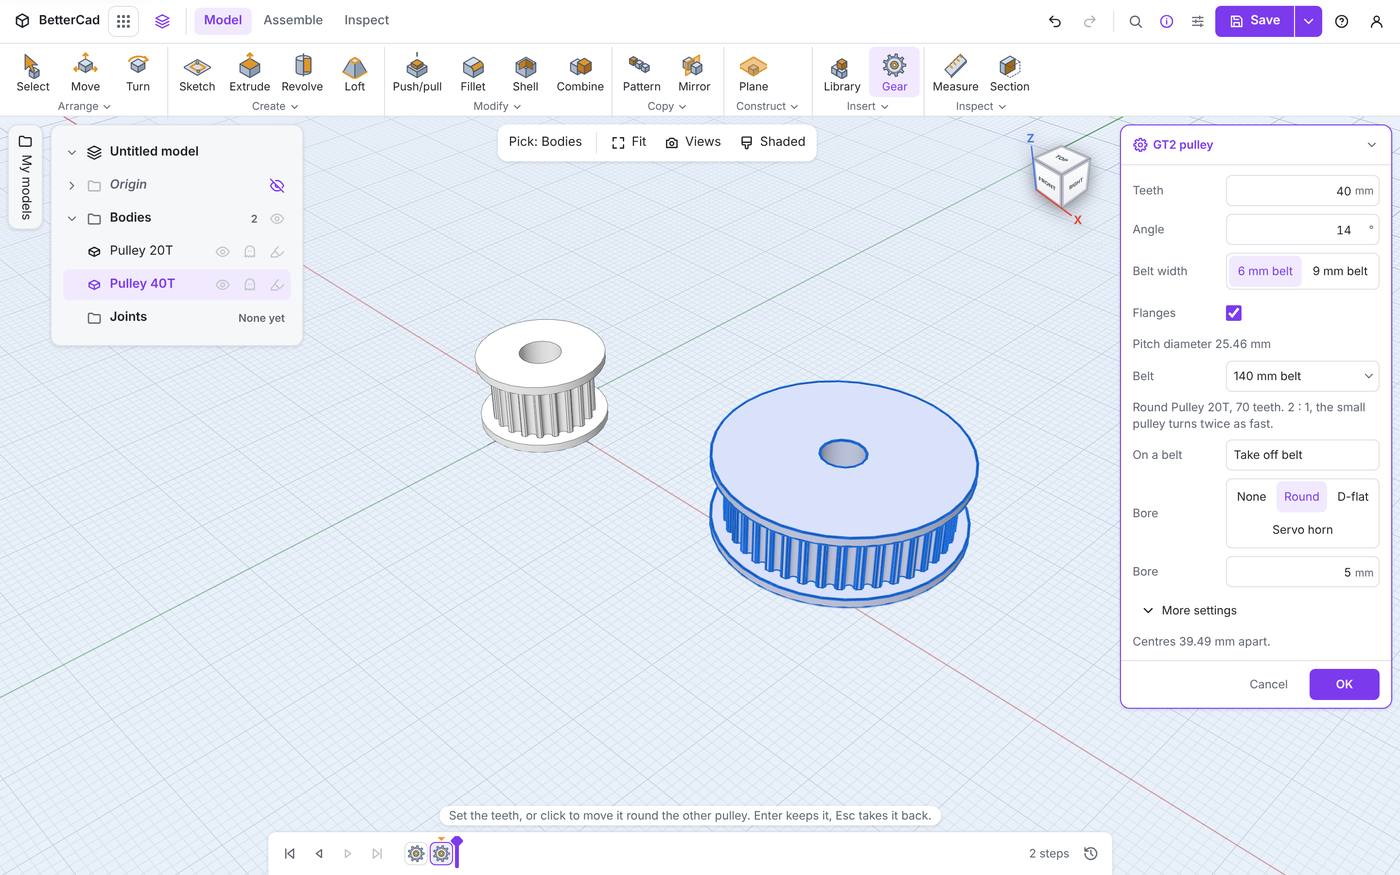
The panel has grown some new rows:
- Belt is a menu of stock belts, here 140 mm belt. Pick a longer or shorter one and the pulley moves to suit.
- “Round Pulley 20T, 70 teeth. 2 : 1, the small pulley turns twice as fast.” That’s the belt’s tooth count and the ratio.
- On a belt has a Take off belt button.
- Centres 39.49 mm apart. This is the number to build the rest of your design round.
- Angle swings the pulley round its partner, keeping the distance.
The belt itself isn’t drawn. BetterCad sets the spacing and leaves the rubber to you.
Gears or a belt?
| Gears | Belt and pulleys | |
|---|---|---|
| Distance between shafts | Must touch | Almost any |
| Direction | Reversed | The same |
| Noise | Clicky | Quiet |
| Extra parts to buy | None | A belt |
| Forgiving of a slightly wrong distance | No | A little, with a tensioner |
Try it Yourself
- Make a 24-tooth gear and add a rack. How far does the rack move in one turn? Check it with the sum above.
- Fit a belt between a 20-tooth and a 60-tooth pulley. Which belt did BetterCad choose, and how far apart are the centres?
- Edit the pulley and choose the next longer belt. How far did the centres move?
Common Issues
Problem: There’s no Fit a belt in the menu. Solution: Select two pulleys first, then right-click one of them. Why: A belt needs two pulleys, and both must be GT2 pulleys from the Gear tool.
Problem: The belt is slack on the printed parts. Solution: Add a slot to one motor mount so it can slide a millimetre or two, or add a small idler to take up the slack. Why: Printed pulleys come out fractionally small and belts stretch a little. Every belt drive needs some adjustment.
Problem: The belt climbs off a pulley. Solution: Keep Flanges on for at least one pulley of the pair, and check the two shafts are parallel. Why: A belt always walks towards the tighter side.
Check your understanding
Quick quiz 1 of 3
A rack runs against a module 1 gear with 20 teeth. How far does it move for one full turn of the gear?
Quick quiz 2 of 3
Why does Fit a belt move a pulley instead of letting you pick any distance?
Quick quiz 3 of 3
Which is true of a belt drive compared with a pair of gears?
You can use the arrows ← → on your keyboard to navigate between lessons.
Comments