Measure Before You Trust
Check a catalogue part against the real thing with the BetterCad Measure tool and a pair of callipers before printing anything tight
By Kevin McAleer, 5 Minutes
Page last updated November 21, 2026

The catalogue told you something important twice in the last lesson: “Sizes aren’t checked: measure yours.” It’s worth a short lesson, because it’s the difference between a servo that drops into its pocket and one that needs a file.
Checked and unchecked parts
Some parts are made to a published drawing or a standard. A Raspberry Pi Pico is 51 × 21 mm with its holes exactly where the datasheet says. A 608 bearing is 22 mm across wherever you buy it.
Others aren’t. “SG90” is a name on thousands of servos from dozens of factories, and they differ by a few tenths of a millimetre. BetterCad is honest about which is which:
| Checked against a drawing or standard | From common listings: measure yours |
|---|---|
| Raspberry Pi Pico and Pico W | SG90 and MG90S micro servos |
| Raspberry Pi Zero 2 W, 4 and 5 | MG996R servo |
| 608 and 623 bearings | N20 and TT gear motors |
| 18650 cell | HC-SR04 ultrasonic sensor |
The unchecked parts are still close, and fine for laying out a design. The check matters when something has to fit snugly.
Measure the catalogue part
- In the deck model, press Esc to clear the selection.
- Click Measure in the Inspect group.
The bar says “Pick something to measure, then something else for the distance. Alt-click takes a whole body.”
- Hold Alt and click the servo.
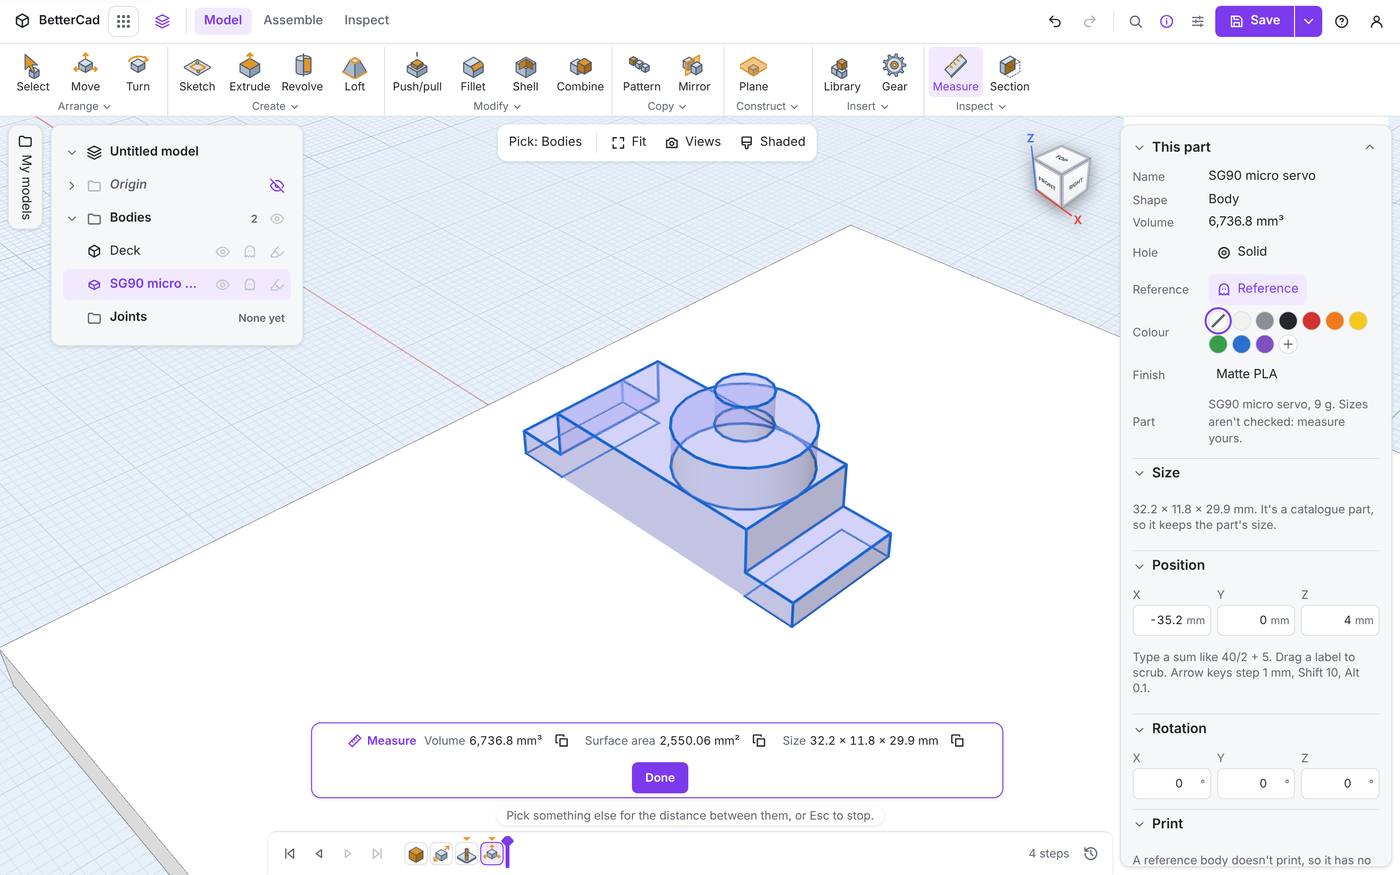
The bar reports the body’s Volume, Surface area and Size: 32.2 × 11.8 × 29.9 mm. The buttons beside each number copy it.
Measure works on a reference body exactly as it does on a printed one. Click a face, an edge or a corner for its own numbers, then click a second thing for the distance between the two. That’s how you check the bits that matter for a mount:
- The body’s length and width, which set the pocket
- The distance between the two screw holes in the tabs
- How far the tabs are from the top of the case
- Click Done, or press Esc.
Measure the real part
Now do the same with callipers on the servo in your hand, and compare.
| What to measure | The catalogue’s SG90 | Yours |
|---|---|---|
| Body length | 22.2 mm | |
| Body width | 11.8 mm | |
| Across the tabs | 32.2 mm | |
| Between the screw holes | 27.8 mm |
If yours is within about 0.2 mm, carry on. The pocket is cut with a sliding fit, which leaves room for that.
If it’s further out, you have two choices. You can let BetterCad cut the pocket and then edit the pocket’s sketch to your numbers, since the pocket is made of ordinary steps. Or, for a part that’s nothing like the catalogue’s, draw your own pocket with a sketch and a cut, the way you learned in Learn BetterCad.
Mass matters too
The catalogue also knows what each part weighs. That isn’t used for printing, but it will be when you turn a model into a robot with joints: BetterCad uses each link’s mass to work out its balance and inertia. That’s a later course. For now it’s a quick way to add up a design: an SG90 is 9 g, a Pico 3 g, an 18650 cell 46 g.
Try it Yourself
- With Measure, click one long side face of the servo’s body, then the opposite one. What distance do you get?
- Alt-click the deck. Does its size match what you typed?
- If you have an SG90 and callipers, fill in the “Yours” column above.
Common Issues
Problem: Measure picks the deck when I want the servo. Solution: Turn the view so the servo is clear of the deck, or hide the deck with Shift+H while you measure. Why: Measure takes whatever is under the pointer.
Problem: My servo is 0.5 mm longer than the catalogue’s. Solution: Cut the pocket, then edit the pocket’s sketch on the timeline to match your part. Why: Clones vary, and the pocket is made of normal steps for exactly this reason.
Check your understanding
Quick quiz 1 of 3
Why does BetterCad say “measure yours” for an SG90?
Quick quiz 2 of 3
What does Alt-click do in the Measure tool?
Quick quiz 3 of 3
Can you measure a reference body?
You can use the arrows ← → on your keyboard to navigate between lessons.
Comments