Reference Bodies
Bring a real part into BetterCad as a reference body that you can design around but that never prints or exports
By Kevin McAleer, 5 Minutes
Page last updated November 21, 2026

You’re making a bracket for a motor. The quickest way to get it right is to have the motor sitting in the model while you draw, so you can see where it touches and measure straight off it.
But the motor isn’t yours to print. If it’s in the model as an ordinary body it turns up in your STL, adds to the print weight and trips the overhang check. BetterCad’s answer is the reference body.
What a reference body is
A reference body is there to design around. It shows in the view, see-through and tinted, and it behaves like any other body when you measure it, snap to it or sketch on it.
It is left out of everything to do with printing:
| A reference body is | A reference body is not |
|---|---|
| Shown in the view, see-through | Exported to STL, 3MF or STEP |
| Measurable, and something sketches can snap to | Counted in the print weight |
| Listed in the Browser like any body | Checked for overhangs, thin walls or bed fit |
Import a file as a reference
Most makers have a folder of STLs for parts they own. Any of them can come in as a reference.
- Download bracket.stl. Pretend it’s a part you bought.
- Start a new model with Ctrl+N.
- Click the word Insert on the Model tab and choose Import as a reference….
- Pick the file.
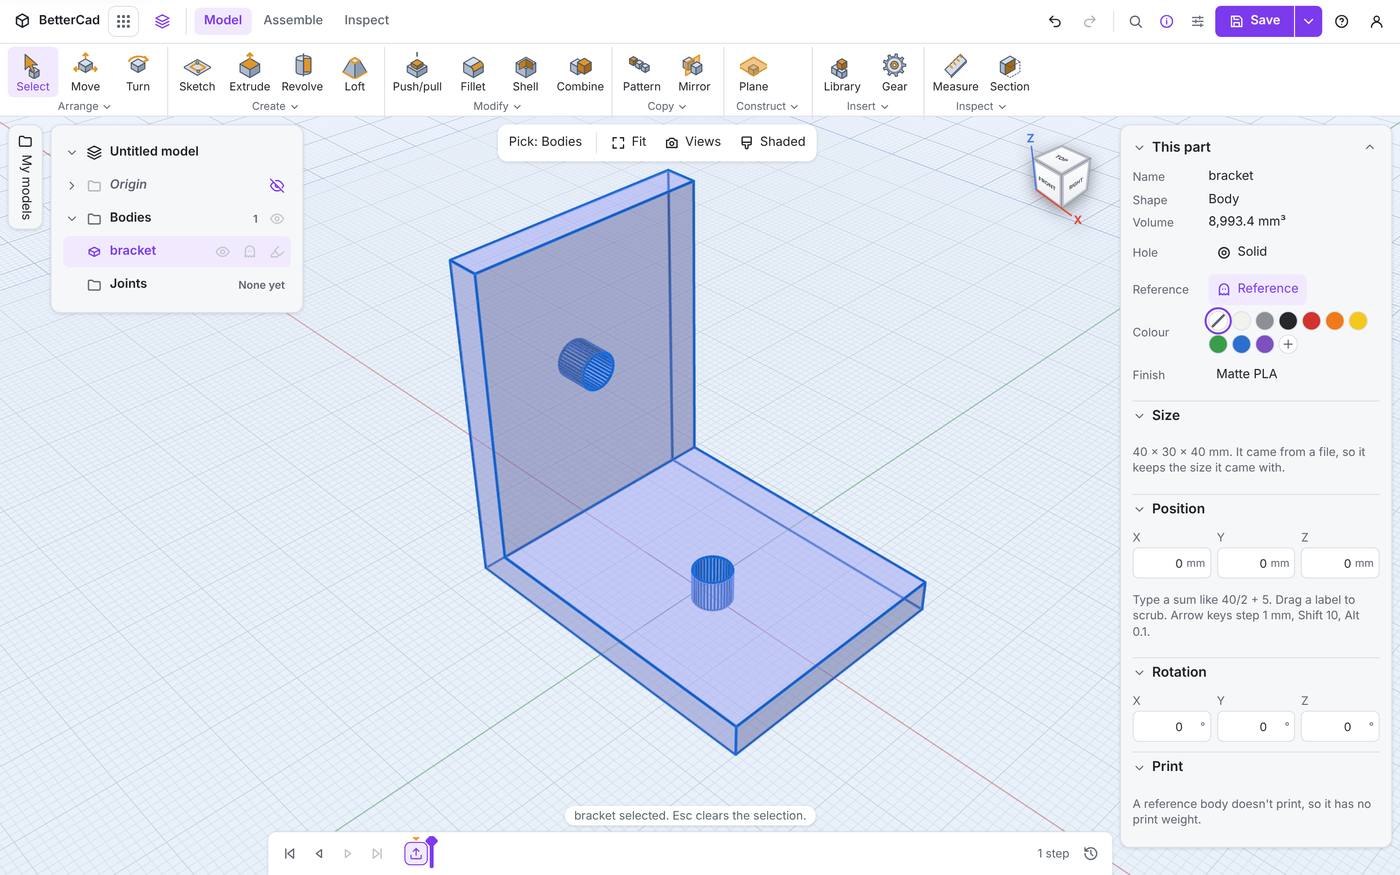
The bracket arrives see-through. Select it and look at Properties. The Reference row reads Reference, the Size section says “It came from a file, so it keeps the size it came with”, and the Print section says “A reference body doesn’t print, so it has no print weight.”
Import as a reference… takes STL, STEP and 3MF files.
Switch a body between reference and printed
Any body can be flipped either way.
- Select the bracket.
- Click Reference in Properties. It changes to Printed, the body turns solid, and the Print section fills in with a volume and weight.
- Click it again to turn it back.
The right-click menu has the same switch: Make a reference on a printed body, Make printable on a reference.
This is handy for your own parts too. Designing a lid for a box you printed last month? Open the box, make it a reference, and draw the lid round it without any risk of printing a second box.
Reference bodies and export
When you export, reference bodies are skipped. There’s one rough edge worth knowing about in the current alpha: the Export dialog counts them in a warning that reads “2 hole shapes weren’t exported. Group them with a solid first.” They aren’t hole shapes, they’re your references, and they’re meant to be left out. Ignore the warning and don’t click Group them now.
Try it Yourself
- Import bracket.stl as a reference, then add a Box from the Library beside it.
- Look at This model in Properties with nothing selected. Does the weight include the bracket?
- Make the bracket printable and look again.
Common Issues
Problem: My imported part is solid, not see-through. Solution: You used Import STL, STEP or 3MF…. Select the body and click Printed in Properties to make it a reference. Why: The plain import brings a file in as a part to print.
Problem: I can’t resize the imported part. Solution: That’s expected. A body from a file keeps the size it came with. Why: An STL is a skin of triangles with no sizes to edit. Lesson 11 shows how to get editable holes out of one.
Problem: Export says “Reference bodies aren’t exported. Turn off Reference in Properties to export one.” Solution: Select a printed body as well, or choose All bodies. Why: References never export, so there was nothing left to write.
Check your understanding
Quick quiz 1 of 3
Which of these does a reference body still do?
Quick quiz 2 of 3
How do you bring an STL in as a reference in one step?
Quick quiz 3 of 3
You opened a box you printed last month and want to design a lid round it. What’s the safe move?
You can use the arrows ← → on your keyboard to navigate between lessons.
Comments