Your First Gear
Generate a 3D printable spur gear in BetterCad and understand teeth, module, pitch diameter and width
By Kevin McAleer, 5 Minutes
Page last updated November 21, 2026

Gears let a small motor do a big job. They trade speed for strength, move a turn from one place to another, and change its direction. Drawing one by hand is miserable, because the curve on each tooth has to be exactly right or the gears grind.
BetterCad draws that curve for you. You say how many teeth and how big, and it makes the gear.
Make a gear
- Start a new model.
- Click Gear in the Insert group.
The bar says “Click the ground or a flat face where the gear goes.”
- Click the ground.
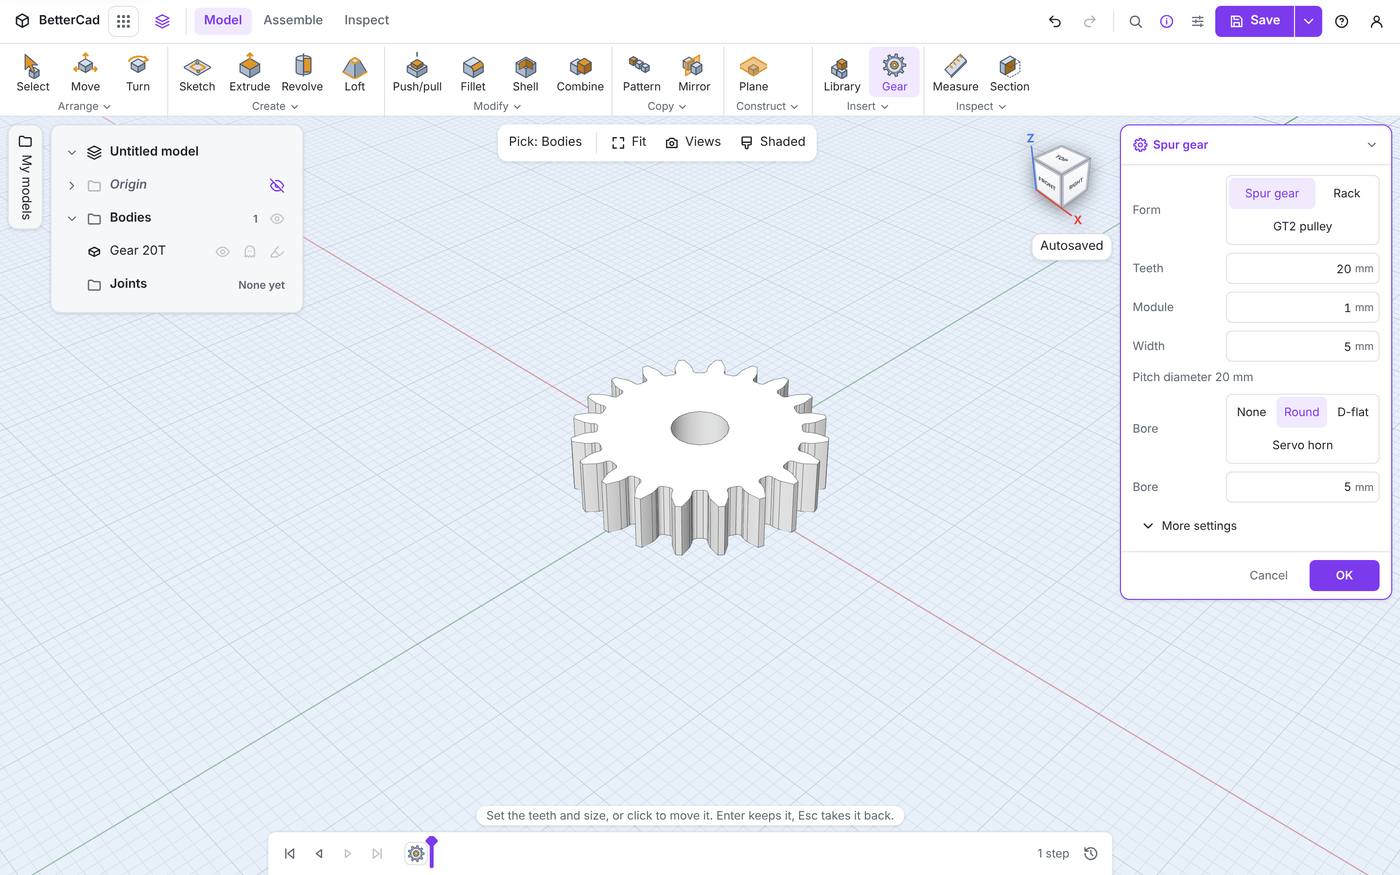
A 20-tooth gear stands where you clicked, and the Spur gear panel opens. Change a number and the gear changes straight away.
| Setting | Starts at | What it is |
|---|---|---|
| Form | Spur gear | Spur gear, Rack or GT2 pulley |
| Teeth | 20 | How many teeth |
| Module | 1 | The size of each tooth |
| Width | 5 mm | How tall the gear stands |
| Bore | Round, 5 mm | The hole in the middle |
- Press Enter or click OK to keep it.
The gear is named Gear 20T in the Browser, and one Gear step sits on the timeline. Change the teeth later and the name follows, until you rename it yourself.
Module: the number that matters
Two gears only mesh if their teeth are the same size. The module is how that size is measured:
# The pitch diameter is the gear's working size:
# the circle where two meshing gears touch.
pitch_diameter = module * teeth        # 1 * 20 = 20 mm

# The outside diameter is two modules bigger,
# because each tooth sticks out one module past the pitch circle.
outside_diameter = module * (teeth + 2)   # 1 * 22 = 22 mm
The panel shows the result as you type: Pitch diameter 20 mm.
So how do you pick a module?
| Module | Tooth size | Good for |
|---|---|---|
| 0.5 | Tiny | Resin printers. Too fine for most filament printers |
| 1 | Small | Micro servos and small mechanisms, with a 0.4 mm nozzle |
| 1.5 | Medium | A safe choice for most printed robot gears |
| 2 | Chunky | High loads, big gears, or a 0.6 mm nozzle |
A bigger module prints more reliably and is stronger, but the gear gets bigger for the same number of teeth. Module 1 is about as small as a 0.4 mm nozzle prints cleanly.
Teeth and width
Teeth sets the gear’s size and, with its partner, the ratio. More on ratios in lesson 9.
Width is the gear’s thickness. Wider teeth share the load over more plastic. 5 mm is fine for a micro servo. Go to 8 or 10 mm for anything that has to push.
Move it and edit it
While the panel is open, click somewhere else on the same surface to move the gear there.
After you’ve pressed OK, the gear is a body like any other. To change its settings again, right-click its step on the timeline and choose Edit gear. The same panel comes back.
A gear on a face
Click a flat face of another body and the gear stands on that face. That’s how you’ll put a gear on top of a servo in the project: click the end of the servo’s shaft, and the gear is centred on it.
Try it Yourself
- Make a gear with 30 teeth at module 1.5. What pitch diameter does the panel show? Work it out first.
- Change Width to 10. Then edit it back to 5 from the timeline.
- Make a gear with module 2 and 12 teeth, and one with module 1 and 24. They have the same pitch diameter. Look at the teeth. Would they mesh?
Common Issues
Problem: I pressed Enter in a number box and the panel closed. Solution: Right-click the Gear step on the timeline and choose Edit gear. Press Tab to move between boxes. Why: Enter keeps the gear and finishes the tool.
Problem: The teeth print as a blobby ring. Solution: Use a bigger module, or a smaller nozzle. Why: A module 1 tooth is only about 1.5 mm thick at the pitch circle, which is close to the limit for a 0.4 mm nozzle.
Problem: I clicked and the gear appeared on a different body. Solution: Press Esc and click again with the view turned so your target face is clear. Why: The gear stands on whichever flat face is under the pointer.
Check your understanding
Quick quiz 1 of 3
A gear has 30 teeth at module 2. What is its pitch diameter?
Quick quiz 2 of 3
What must two gears share to mesh?
Quick quiz 3 of 3
How do you change a gear’s teeth after pressing OK?
You can use the arrows ← → on your keyboard to navigate between lessons.
Comments