Giving Your Part Its Own Blocks
Write a blocks.yml file for your Snakie part so it adds friendly custom blocks to the Blocks workspace
By Kevin McAleer, 6 Minutes
Page last updated November 21, 2026

Snakie’s derived blocks get you started. A part that’s really finished has blocks that read like a sentence: distance in mm from the sensor. You make those with one small text file.
The file
Blocks for a part live in a file called blocks.yml, in the part’s folder next to parts.yml. Snakie reads this file but never writes it. It’s yours.
- In the Library, click Reveal the parts folder.
- Open
my-parts, thenvl53l0x-distance-sensor. - Create a new text file there called
blocks.yml.
You can download our finished file here: blocks.yml.
Block one: the sensor
Type this in. Indentation matters in YAML, so use spaces, two per level.
version: 1
blocks:
  - id: sensor
    message: VL53L0X on I²C %1 with SDA %2 and SCL %3
    shape: value
    output: Object
    args:
      - name: BUS
        kind: number-field
        default: 0
      - name: SDA
        kind: pin
        capability: i2c
        default: 4
      - name: SCL
        kind: pin
        capability: i2c
        default: 5
    setup:
      key: "vl53l0x:{BUS}:{SDA}:{SCL}"
      name: tof
      expr: "VL53L0X(I2C({BUS}, sda=Pin({SDA}), scl=Pin({SCL})))"
    code: "{SETUP}"
    imports:
      - module: vl53l0x
        name: VL53L0X
      - module: machine
        name: I2C
      - module: machine
        name: Pin
    tooltip: The distance sensor itself. Plug it into the distance block.
It looks like a lot, but each line has one simple job.
| Key | What it does |
|---|---|
id |
A short name for the block, unique within the file |
message |
The words on the block. %1, %2 and %3 are the gaps for the arguments |
shape |
value makes a rounded block that plugs into others |
output |
What kind of thing it gives back |
args |
One entry for each gap in the message, in order |
setup |
Code that must run once, at the top of the program |
code |
The Python the block becomes. {SETUP} means the variable made by setup |
imports |
The from ... import ... lines the code needs |
tooltip |
The hint shown when you hover over the block |
Why setup matters
A sensor should be opened once, not every time round a loop. The setup section handles that:
expris the line that creates the sensor.nameis the variable it’s stored in,tof.keyidentifies it. Two blocks with the same key share one sensor. Change the bus or a pin and the key changes, so you get a second sensor.
Argument kinds
| Kind | What the learner sees |
|---|---|
number-field |
A number they can type |
pin |
A drop-down of the board’s pins. Add capability to list only suitable ones |
any |
A socket another block plugs into |
Block two: the reading
Add this under the first block, lined up with it.
  - id: distance
    message: distance in mm from %1
    shape: value
    output: Number
    args:
      - name: SENSOR
        kind: any
        shadow: sensor
    code: "{SENSOR}.ping()"
    tooltip: How far away the nearest thing is, in millimetres.
shadow: sensor pre-fills the socket with block one. Drag out distance in mm from and it already works.
ping() is the method in Kev’s driver that takes one reading and returns millimetres.
See your blocks
Save the file and restart Snakie. Open Blocks, then My parts, then your sensor.
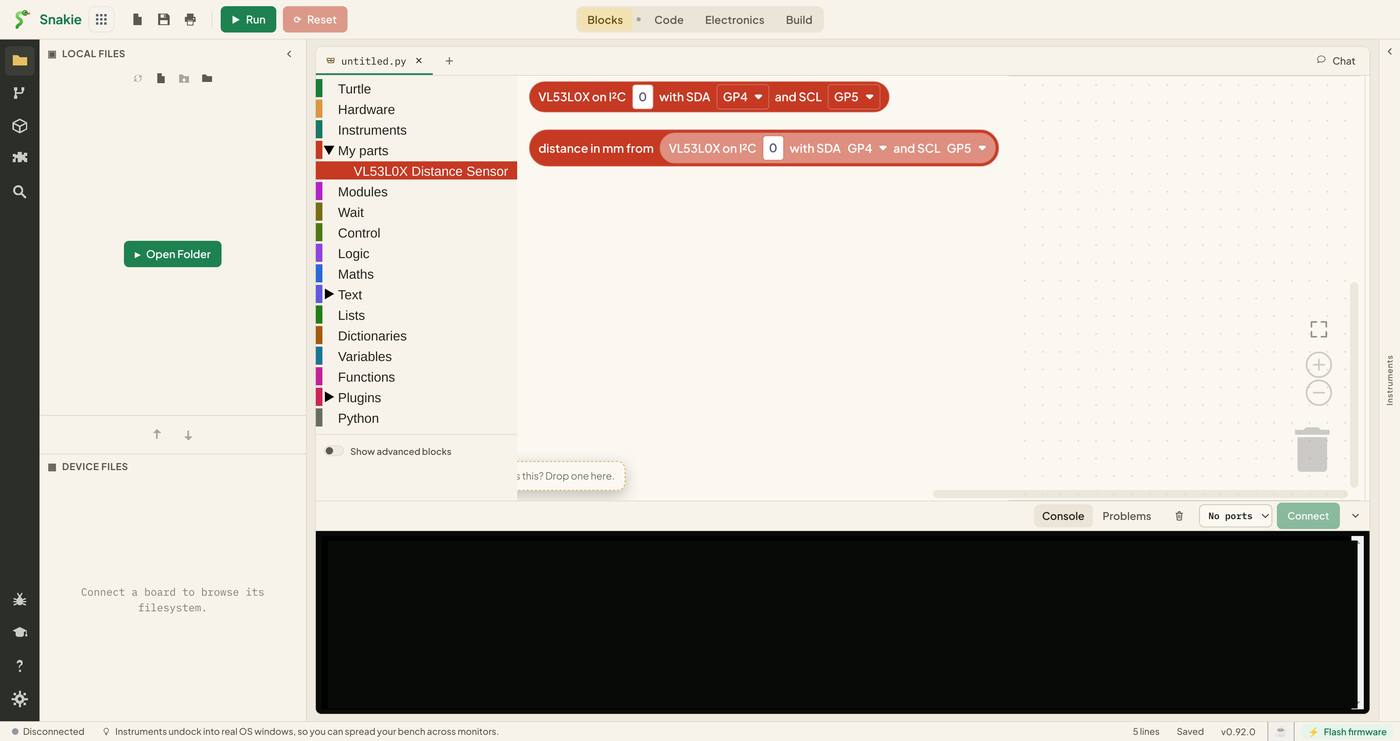
The rough derived blocks have gone and yours are in their place. The pin drop-downs show GP4 and GP5, the defaults from your file, and they only list pins that can do I2C.
Snakie is designed to fill these pins in from the real wiring on your breadboard. In our tests with version 0.92.0 the blocks showed the defaults from the file instead. So choose defaults that match the wiring in your help page, and check the drop-downs before you run.
From blocks to Python
- From Text, drag a print block onto the canvas.
- Drag distance in mm from into it, replacing the text.
- Click the dot between Blocks and Code at the top to see blocks and Python side by side.
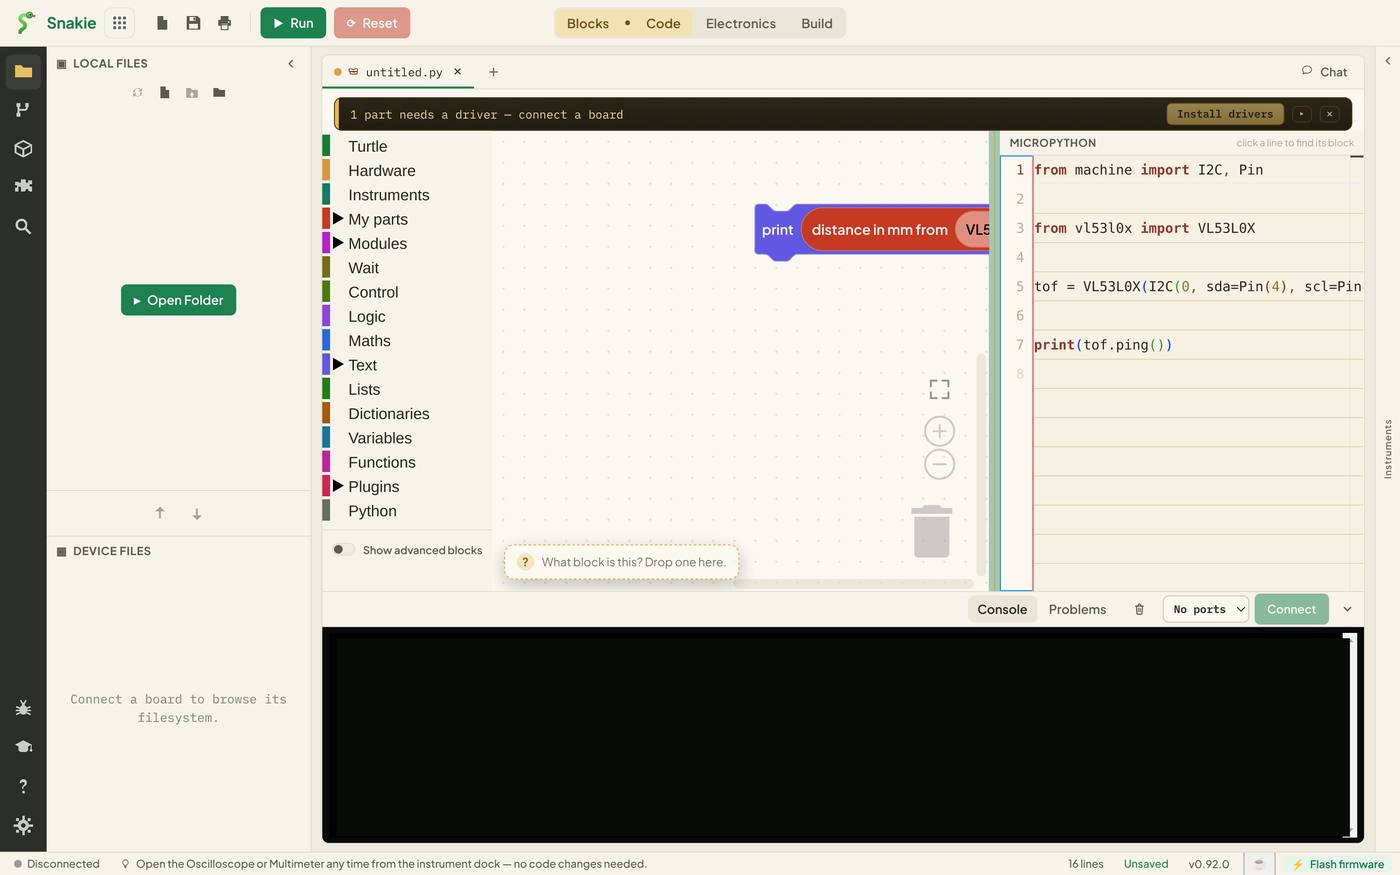
Two blocks became this:
from machine import I2C, Pin
from vl53l0x import VL53L0X

tof = VL53L0X(I2C(0, sda=Pin(4), scl=Pin(5)))

print(tof.ping())
Every line traces back to your file. The imports came from imports, the tof = ... line from setup, and tof.ping() from the second block’s code.
Try it Yourself
Add a third block that reports whether something is close:
  - id: is_close
    message: "%1 sees something closer than %2 mm"
    shape: value
    output: Boolean
    args:
      - name: SENSOR
        kind: any
        shadow: sensor
      - name: LIMIT
        kind: number-field
        default: 200
    code: "({SENSOR}.ping() < {LIMIT})"
    tooltip: True when something is nearer than the limit.
Restart Snakie and try it inside an if block. Then change the wording of a message and see it update.
Common Issues
Problem: My blocks don’t appear, and the derived ones are still there.
Solution: Check the file is named exactly blocks.yml and is in the same folder as parts.yml, then restart Snakie.
Why: Snakie looks for that one file name beside the part.
Problem: One block is missing but the others are fine.
Solution: Check that block’s indentation and that it has an id, a message and code.
Why: Snakie drops a block it can’t understand and keeps the rest.
Problem: The window goes blank when I switch from Blocks to Code. Solution: Restart Snakie, and use the split view dot to see the Python. Why: We saw this in version 0.92.0 with a part block that has a pin drop-down on the canvas.
Problem: A lone distance block writes no Python. Solution: Plug it into something that uses the value, such as print. Why: A value on its own isn’t an instruction.
Check your understanding
Quick quiz 1 of 3
Where does blocks.yml go?
Quick quiz 2 of 3
What is the setup section for?
Quick quiz 3 of 3
Why give the SDA argument capability: i2c?
You can use the arrows ← → on your keyboard to navigate between lessons.
Comments