A Tour of the Part Editor
Open the Snakie Part Editor and learn its three views, the toolbar, the Layers list and the Inspector
By Kevin McAleer, 4 Minutes
Page last updated November 21, 2026

Time to open the editor and look around. You won’t build anything yet. The goal is to know where everything is, so the next lessons can move quickly.
Opening the editor
- Open the Electronics workspace.
- In the Library panel, click + New part.
The Part Editor fills the window with a starter board: a green rectangle with four pins called VCC, GND, GP0 and GP1.
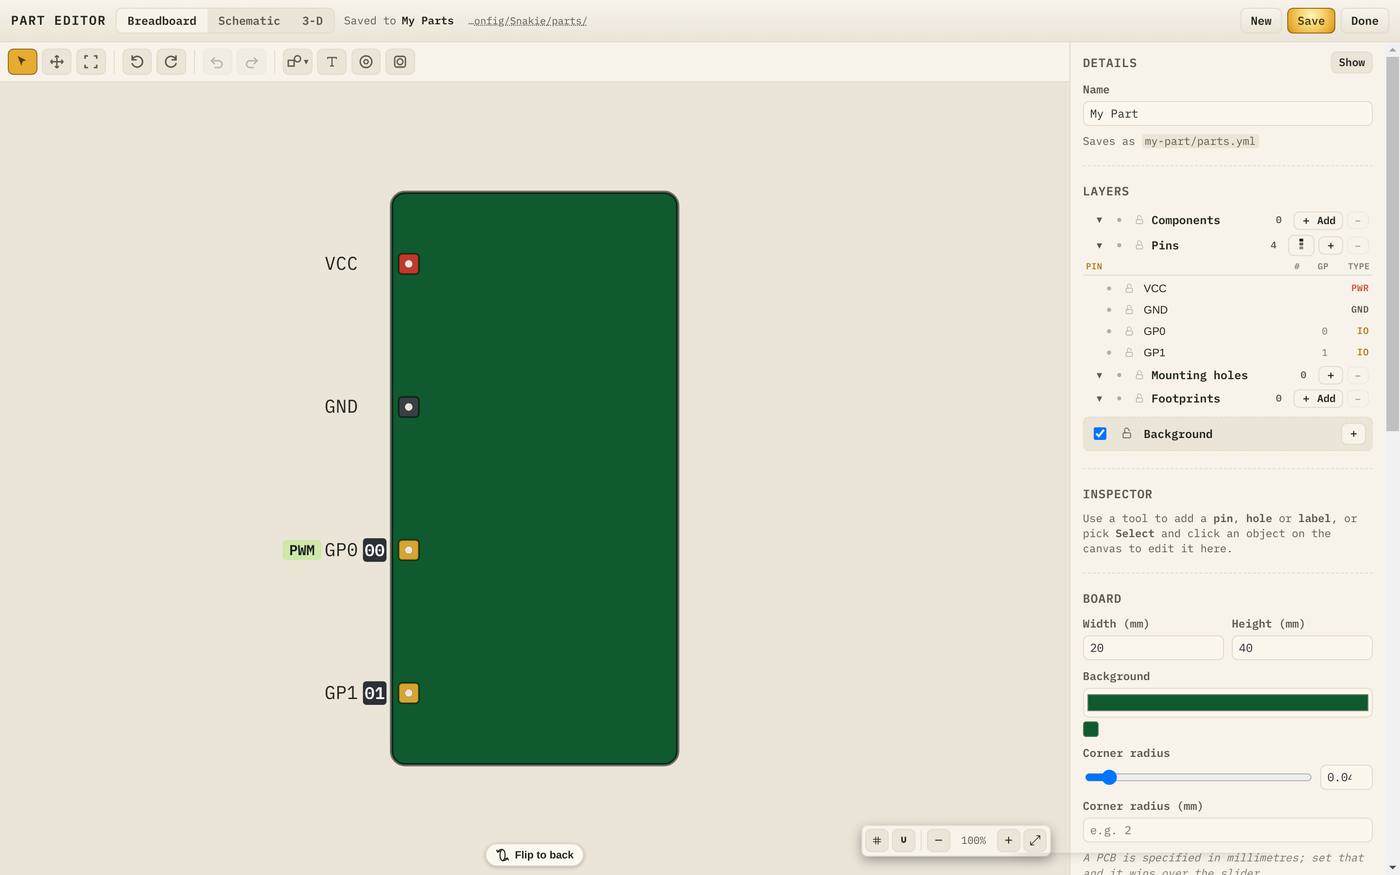
The top bar
| Control | What it does |
|---|---|
| Breadboard | The view you draw in: the board as it looks on the bench |
| Schematic | The part’s circuit symbol and which side each pin sits on |
| 3-D | Link a 3-D model for the Build workspace |
| Saved to My Parts | Where the part will be saved |
| New | Start another blank part |
| Save | Write the part to your library |
| Done | Close the editor |
The canvas toolbar
The row of buttons above the board holds the drawing tools.
| Button | What it does |
|---|---|
| Select | Click and drag objects |
| Pan | Drag the view around. Scroll to zoom |
| Fit | Bring the whole board back into view |
| Rotate left / right | Turn the whole board by 90 degrees |
| Undo / Redo | Ctrl+Z and Ctrl+Shift+Z |
| Shapes | Draw a rectangle, circle or polygon |
| Text | Add a label |
| Mounting hole | Click the board to add a hole |
| Push-button | Add a button to the board |
In the bottom right corner of the canvas are the grid and snap buttons and the zoom controls. At the bottom is Flip to back, for boards that have parts or pins on the underside.
The side panel
The panel on the right is where the detail lives. It scrolls a long way, so here’s the map.
| Section | What it holds |
|---|---|
| Details | The name, plus a Show button for everything else about the part |
| Layers | Every object on the board, grouped: Components, Pins, Mounting holes, Footprints, Background |
| Inspector | The settings for whatever you’ve selected |
| Board | Width and height in millimetres, colour and corner radius |
| Electrical | How the part behaves in a circuit |
| Rails | Pins that are joined together inside the part |
| I²C | The addresses the part answers on |
| Drivers | Files the part needs on your board |
Every row in Layers has an eye to hide it and a padlock to lock it. Lock a layer when you’ve finished with it, so you can’t nudge it by accident.
Selecting things
Click a pin on the board, or its name in the Layers list. The Inspector changes to show that pin, and a small floating toolbar appears with Duplicate, Rotate, Copy style and Paste style.
Click an empty part of the canvas to deselect.
Try it Yourself
- Click + New part.
- Click the pin called GP0. Read the Inspector.
- Click Schematic, then 3-D, then come back to Breadboard.
- Scroll the side panel to the bottom and find Drivers.
- Click Done. You haven’t saved, so nothing is kept.
Common Issues
Problem: I can’t find + New part. Solution: Open the Electronics workspace and show the Library panel with the arrow at the right edge. Why: The Library panel can be collapsed to make room for the breadboard.
Problem: The board has gone off screen. Solution: Click Fit in the toolbar. Why: Scrolling zooms the canvas, and it’s easy to zoom too far.
Check your understanding
Quick quiz 1 of 3
Which view do you draw the board in?
Quick quiz 2 of 3
What does the padlock next to a layer do?
Quick quiz 3 of 3
Where do you change the settings of a selected pin?
You can use the arrows ← → on your keyboard to navigate between lessons.
Comments