Holes, Components and Labels
Add mounting holes, component shapes and text labels to a part in the Snakie Part Editor so it looks like the real board
By Kevin McAleer, 4 Minutes
Page last updated November 21, 2026

Your part works already: it has a size and six pins. This lesson makes it look like the real thing, which matters more than you’d think. On a busy breadboard you find a part by its shape.
Mounting holes
Our breakout has a hole in each top corner.
- Click the Mounting hole button in the toolbar.
- Click the top left corner of the board, then the top right.
- Click Select.
Click Hole 1 in the Layers list. The Inspector shows three numbers: x, y and ⌀mm, the diameter in millimetres. Ours are 2.5 mm holes, placed 2.5 mm in from the edges.
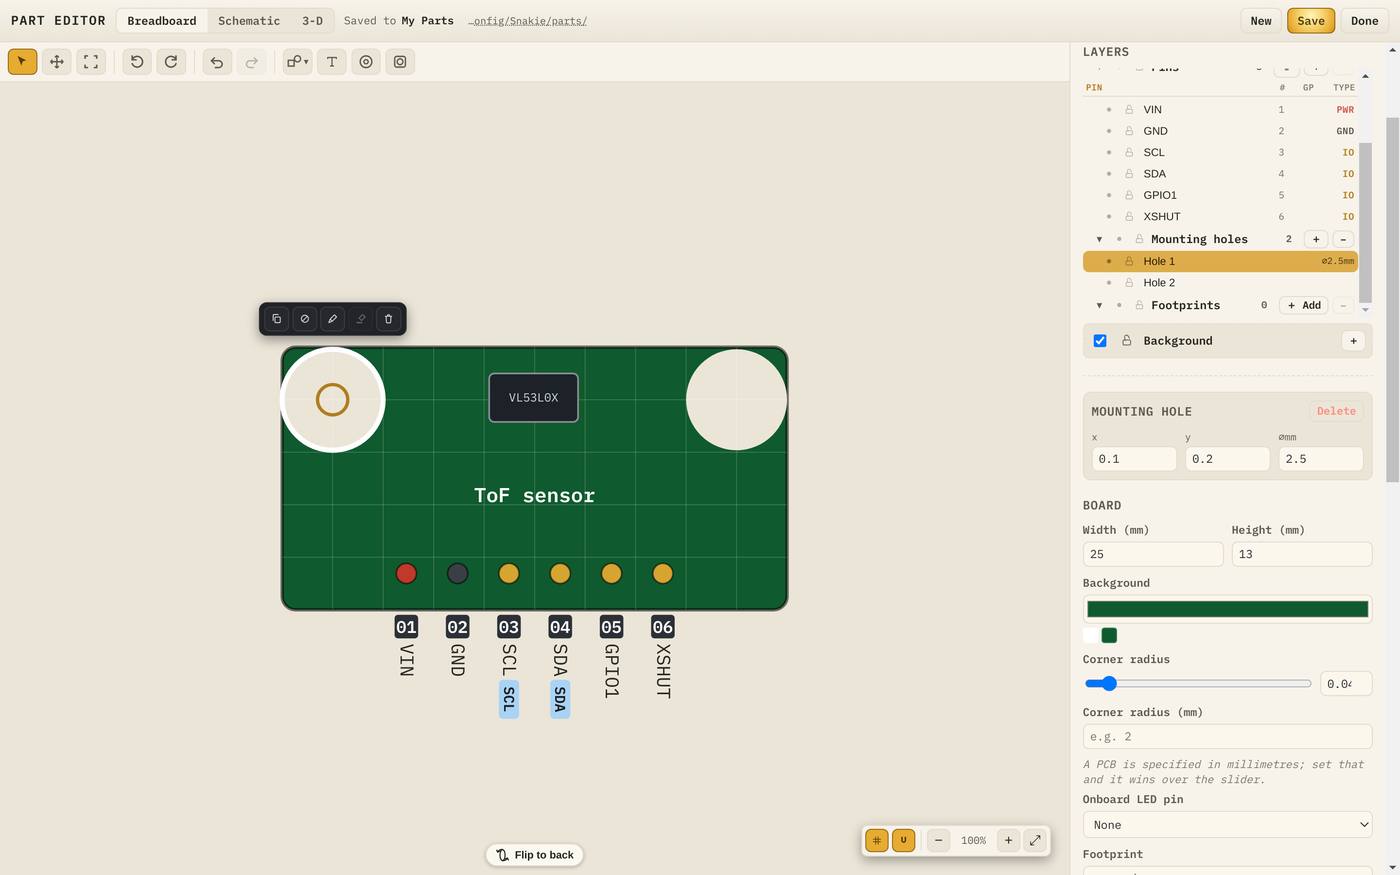
In Snakie 0.92.0 a hole is drawn about twice as wide as the diameter you type. The number saved in the part is still the one you typed, so enter the real size.
Snakie won’t let a pin sit inside a hole, so place the holes before you crowd the board with pins.
A component body
The black sensor chip is the most recognisable thing on the board. Let’s draw it.
- In Layers, click + Add on the Components row.
- Choose Component. A grey rectangle appears.
- In the Inspector, set Text to
VL53L0X. - Set w (mm) to
4.4and h (mm) to2.4. - Drag it to the top middle of the board.
The + Add menu has more than plain rectangles:
| Item | What it adds |
|---|---|
| Button | A push-button |
| LED | An onboard LED |
| Component | A grey body for a chip, regulator or connector |
| Connector | A QWIIC or STEMMA QT socket |
| Grove port | A Grove socket |
| Servo header | A three-pin header for a servo lead |
| Terminal block | A green screw terminal |
| Pin | One more pin |
Connectors, Grove ports, servo headers and terminal blocks aren’t just pictures. They bring their pins with them, already named.
For free-form shapes, use Shapes in the toolbar to draw a rectangle, circle or polygon.
Text labels
- Click Text in the toolbar.
- Click the board where the label should go.
- In the Inspector, change Text to
ToF sensor. - Adjust size and Colour until it reads well. B, I and U make it bold, italic or underlined.
- Click Select.
Stacking order
Components draw in the order they appear in the Layers list, with the top of the list on top. Drag a row by its ⋮⋮ handle to reorder it.
The layers themselves stack in a fixed order: the circuit board at the bottom, holes cut through it, and pins and components on top.
Copy a style
Made one label look just right? Select it and click Copy style on the floating toolbar. Select another and click Paste style. It saves a lot of clicking on boards with many labels.
Try it Yourself
- Add the two mounting holes and set both to 2.5 mm.
- Add the chip as a Component and name it.
- Add a text label.
- Click the eye on the Components row to hide them all, then click it again.
- Save.
Common Issues
Problem: I can’t put a pin where I want it. Solution: Check there isn’t a mounting hole there. Why: Pins can’t sit in holes, so the editor refuses the spot.
Problem: My label is hidden behind the chip. Solution: Drag the label’s row above the chip’s row in the Layers list. Why: The top row is drawn on top.
Problem: The holes look too big. Solution: Leave the true diameter in place. Why: Version 0.92.0 draws them oversized. The saved value is correct.
Check your understanding
Quick quiz 1 of 3
What does the ⌀mm box set?
Quick quiz 2 of 3
You add a Grove port from the Add menu. What do you get?
Quick quiz 3 of 3
How do you bring a label in front of a component?
You can use the arrows ← → on your keyboard to navigate between lessons.
Comments