The Electronics Workspace
Take a tour of Snakie's Electronics workspace, from the breadboard canvas and project browser to the parts library and the toolbar
By Kevin McAleer, 5 Minutes
Page last updated November 20, 2026

Before we place a single part, let’s find out where everything is.
Open the workspace
Open Snakie and click Electronics in the workspace switcher at the top of the window.
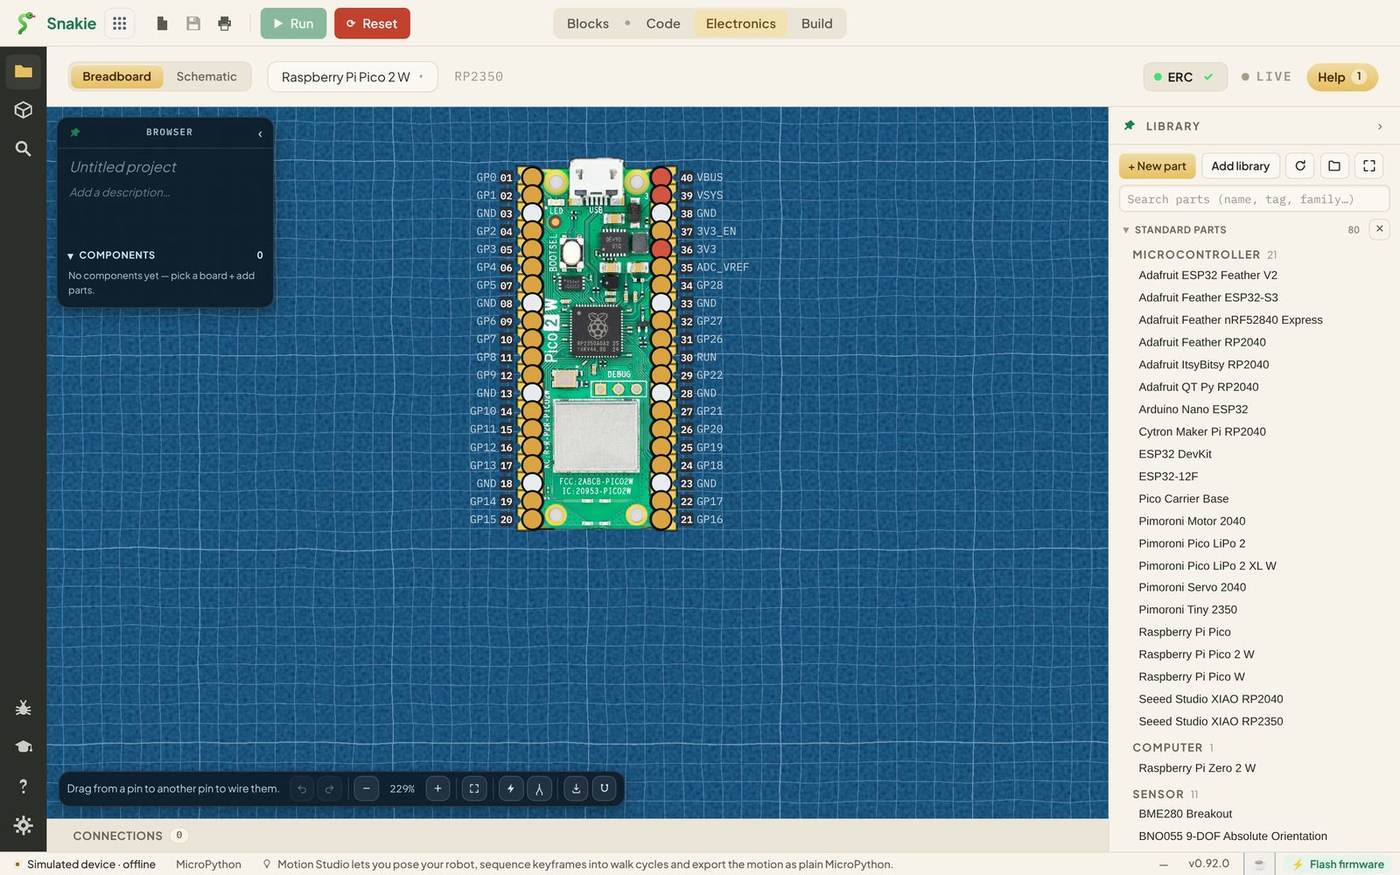
You don’t start with an empty page. A board is already waiting for you, drawn from a photo with every pin numbered and named. That’s the board your parts will be wired to.
The canvas
The big blue area is the canvas. Think of it as your workbench. Parts sit on it, and wires run between them.
- Drag a part to move it
- Drag the empty background to slide the whole view around
- Use − and + in the toolbar to zoom, or the Zoom to fit button to bring everything into view
Look closely at the board. Each pin has a coloured dot: red for power pins, white for ground pins, and amber for the GPIO pins your code controls. Those dots are where wires start and end.
Around the edges
| Where | What | What it’s for |
|---|---|---|
| Top left | Breadboard and Schematic tabs | Two views of the same circuit. Lesson 5 |
| Top left | Board selector | Choose which board you’re wiring to |
| Top right | ERC badge | The Electrical Rules Check. Green tick means no faults found |
| Top right | LIVE | Shows real pin values from a connected board |
| Top right | Help | Help pages for the parts you’ve placed |
| Left | Browser | Your project’s name, description and component list |
| Right | Library | Every part you can add |
| Bottom | Connections | A table of every wire. Lesson 8 |
The toolbar
The dark bar at the bottom of the canvas has a hint on the left that changes as you work. Right now it says Drag from a pin to another pin to wire them. It’s worth glancing at when you’re not sure what a click will do.
Beside the hint are the tools:
| Button | What it does |
|---|---|
| Undo and Redo | Step back and forward through your changes |
| − 100% + | Zoom out, the zoom level, zoom in |
| Zoom to fit | Fit every part into the view |
| Show node voltages | Work out the voltage on every wire |
| Multimeter | Probe a pin or a wire |
| Export image | Save a PNG, SVG, PDF or parts list |
| Snap to grid | Line a part up with the grid |
Hover over any button and Snakie tells you what it does.
The Browser
The Browser panel on the left is your project at a glance. Click Untitled project and give it a name, then add a line of description underneath. Both appear on the build guide you’ll print in lesson 9.
Below that is Components: a list of everything on the canvas. It’s empty for now, with the hint No components yet — pick a board + add parts.
The pin icon at the top of each panel keeps it open. Unpin it and the panel tucks itself away when you click elsewhere, which is handy on a small screen.
Your work is kept
A wiring project is saved as you go. Once you’ve named it, the Browser shows a small Saved to robot.yml note under the description. And every change can be undone with Ctrl+Z, so nothing you try in this course can break anything.
Try it Yourself
- Drag the board to the middle of the canvas, then drag the background to move the view.
- Zoom right in on the board and read the names of pins 36, 38 and 40. Which is power and which is ground?
- Name your project
Obstacle Robot. We’ll build on it for the rest of the course.
Common Issues
Problem: I can’t see the Library or the Browser. Solution: Look for the word LIBRARY down the right-hand edge, or the small button at the top left of the canvas, and click it. Why: Both panels can be collapsed to give the canvas more room.
Problem: The board has drifted off the screen. Solution: Click Zoom to fit in the toolbar. Why: Dragging the background moves the whole view, and it’s easy to drag too far.
Problem: I moved the board when I meant to draw a wire. Solution: Press Ctrl+Z, then start the drag on a pin’s dot. Why: A drag that starts on a pin makes a wire. A drag that starts anywhere else on a part moves it.
Check your understanding
Quick quiz 1 of 3
What does a red dot on a pin mean?
Quick quiz 2 of 3
What does dragging the empty background do?
Quick quiz 3 of 3
Where is the list of parts in your project?
You can use the arrows ← → on your keyboard to navigate between lessons.
Comments