Exporting URDF
Export a BetterCad robot as a URDF zip with meshes, masses and joint limits, and understand what is inside the file
By Kevin McAleer, 6 Minutes
Page last updated November 21, 2026

Your arm moves on screen. To make it move anywhere else, in a physics simulator, in ROS, in a motion planner, those tools need to know everything you’ve just set up: the parts, how they’re joined, how far each joint turns and what each part weighs.
The format nearly all of them read is URDF, the Unified Robot Description Format. BetterCad writes it for you.
Before you export
Open your desk arm again and run through this list:
| Check | Why |
|---|---|
| Every joint has a real name | Joint names go into the file, and your code will use them |
| Limits match your hardware | Simulators and planners obey them |
| A sweep says nothing hits | A robot that clashes on screen will clash in a simulator |
| The model has a sensible name | It becomes the robot’s name and the folder’s name |
| Home is a sensible resting pose | The file describes the robot at home |
Export
- Press Ctrl+E, or open the arrow beside Save and choose Export….
- Click URDF in the Format row.
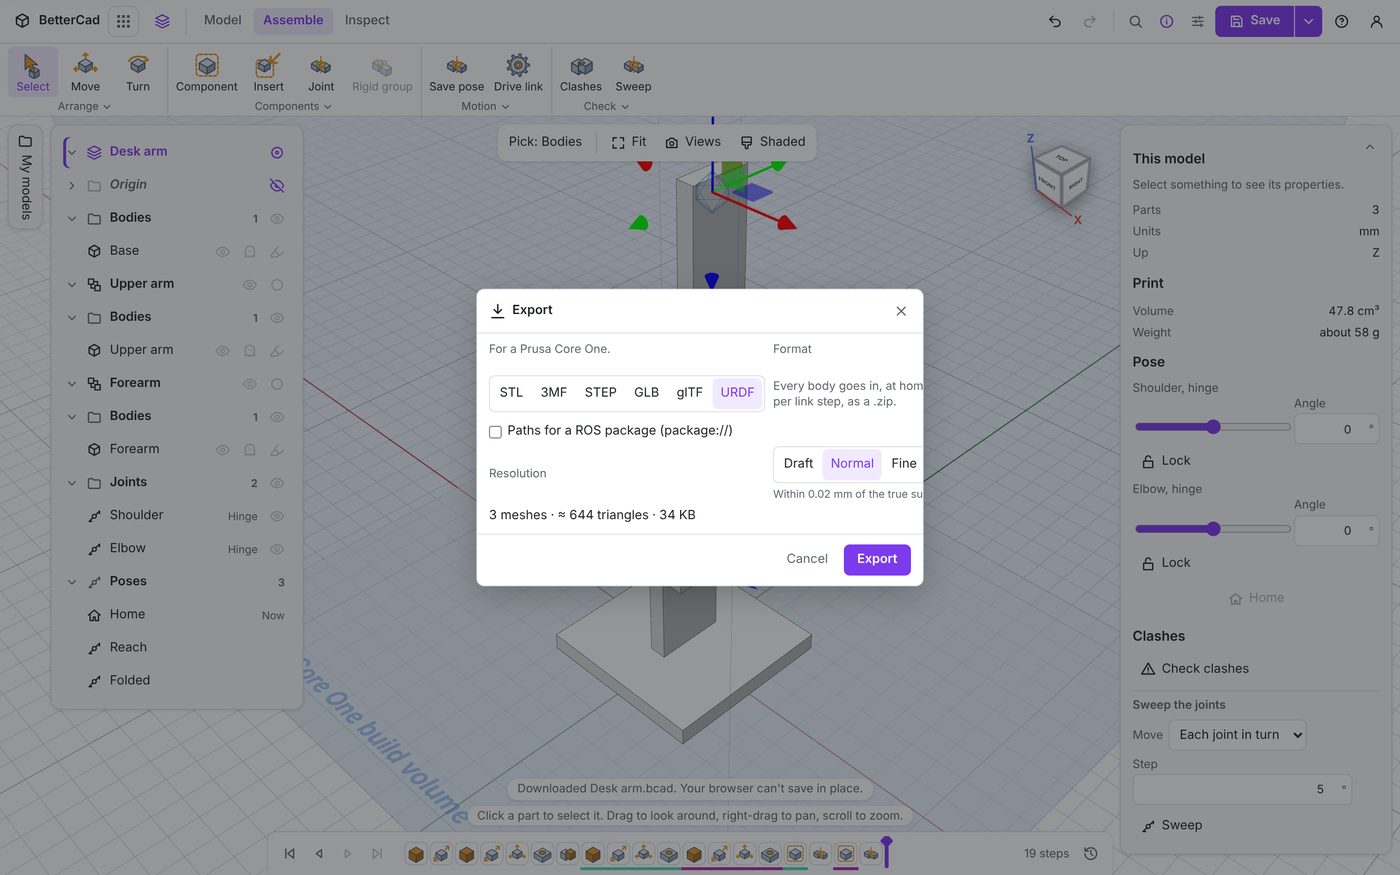
The box says “Every body goes in, at home, one link per link step, as a .zip.” Underneath it counts what will be written: 3 meshes and roughly how many triangles.
- Click Export.
A file called Desk arm.zip downloads, and the bar says “Exported Desk arm.zip”.
What’s in the zip
Desk_arm/
  Desk_arm.urdf
  meshes/
    base_link.stl
    Upper_arm.stl
    Forearm.stl
One URDF file and one mesh for each moving part. Base has become base_link, the usual name for the root of a robot in ROS. Spaces in names have become underscores.
Reading the URDF
Open Desk_arm.urdf in any text editor. It’s XML, and it has two kinds of thing in it: links and joints.
A link is a rigid part. This is the forearm:
<link name="Forearm">
  <inertial>
    <origin xyz="0.003 0 0.024973711" rpy="0 0 0"/>
    <mass value="0.00884412"/>
    <inertia ixx="0.00000401018" ... izz="3.46648e-7"/>
  </inertial>
  <visual>
    <origin xyz="0 0 0" rpy="0 0 0"/>
    <geometry><mesh filename="meshes/Forearm.stl"/></geometry>
    <material name="Forearm_material"><color rgba="0.8 0.8 0.8 1"/></material>
  </visual>
  <collision>
    <origin xyz="0 0 0" rpy="0 0 0"/>
    <geometry><mesh filename="meshes/Forearm.stl"/></geometry>
  </collision>
</link>
| Part | What it is | Where it came from |
|---|---|---|
inertial |
Mass, centre of mass and inertia | The Mass section in Properties |
visual |
The shape to draw | The body, exported as an STL |
collision |
The shape to test for contact | The same STL |
URDF works in metres, kilograms and radians, so the numbers look small. The mass of 0.00884412 kg is the 8.8 g you saw in Properties, and the centre of mass sits 0.025 m, or 25 mm, from the elbow.
A joint connects two links. This is the elbow:
<joint name="Elbow" type="revolute">
  <parent link="Upper_arm"/>
  <child link="Forearm"/>
  <origin xyz="0.006 0 0.070000002" rpy="0 0 0"/>
  <axis xyz="1 0 0"/>
  <limit lower="-1.570796327" upper="1.570796327" effort="10" velocity="1"/>
</joint>
| Part | What it is |
|---|---|
type |
revolute, continuous, prismatic or fixed. The names in brackets in the Kind list |
parent, child |
Hangs from, and Moves |
origin |
Where the joint sits, measured from the parent’s own joint |
axis |
The direction of the axle |
limit |
Lower and Upper in radians. -1.5708 is -90 degrees |
Everything you set in the Joint panel is there. effort and velocity are placeholders, the most force and speed the joint’s motor can give. If your simulator cares, edit them to match your servo.
Drive links in URDF
Export the servo deck from the last lesson and its driven joint has one extra line:
<joint name="Output" type="continuous">
  <parent link="base_link"/>
  <child link="Gear_48T"/>
  <origin xyz="0.006 0 0.018" rpy="0 0 0"/>
  <axis xyz="0 0 1"/>
  <limit effort="10" velocity="1"/>
  <mimic joint="Servo" multiplier="-0.5" offset="0"/>
</joint>
mimic is URDF’s way of saying this joint copies that one. The multiplier is the ratio BetterCad worked out from the teeth.
Paths for a ROS package
In a plain export, each mesh is found by a path beside the URDF file: meshes/Forearm.stl. That suits most simulators and viewers.
ROS finds files by package name. Tick Paths for a ROS package (package://) before exporting and the same line becomes:
<mesh filename="package://Desk_arm/meshes/Forearm.stl"/>
Unzip the folder into a ROS workspace as a package called Desk_arm and the paths resolve. If you’re new to ROS, Learn ROS with me is the place to start.
Other exports from a posed model
URDF always describes the robot at home. Other formats in the same box are worth knowing about:
- STL has a tick box, Export as posed. Without it every joint is at home
- GLB and glTF suit web viewers and slides
Try it Yourself
- Export the arm and find the Shoulder joint in the URDF file. What are its limits in radians? Multiply by 57.3 to check they match your degrees.
- Change the Shoulder to a Wheel, export again, and compare the joint’s
typeandlimit. Change it back. - Search for an online URDF viewer, drop your zip’s contents in, and move the joints there.
Common Issues
- Problem: The viewer shows the joints but no shapes
- Solution: Keep the
meshesfolder beside the URDF file, or export with package paths if the tool is ROS -
Why: The URDF file only names the meshes. They’re separate files
- Problem: The robot loads lying on its side
- Solution: Set the tool’s up axis to Z
-
Why: BetterCad and URDF both use Z up. Some viewers assume Y
- Problem: A part you expected as its own link is missing from the list
- Solution: Give it a joint. Use a Fixed joint if it doesn’t move
- Why: Each moving part becomes a link. Bodies that aren’t in a component are all part of base_link
Check your understanding
Quick quiz 1 of 3
What units does URDF use for a hinge’s limits?
Quick quiz 2 of 3
In the URDF file, what does a BetterCad component on a joint become?
Quick quiz 3 of 3
What does the mimic line on a joint mean?
You can use the arrows ← → on your keyboard to navigate between lessons.
Comments