Your First Joint
Make a hinge joint in BetterCad by picking a snap on the part that moves and a snap on the part it hangs from
By Kevin McAleer, 5 Minutes
Page last updated November 21, 2026

A joint in BetterCad takes two clicks. The first says this point, on the part that moves. The second says goes here, on the part it hangs from. BetterCad moves the part into place and works out the axle.
Let’s hang the upper arm on the base. This joint is the arm’s shoulder.
Pick the part that moves
- On the Assemble tab, click Joint.
The Joint panel opens on the right and the bar says “Click a snap point, face or round edge on the part that moves.”
- Move the pointer over the top of the Upper arm.
The face lights up and dots appear on it. Those are snap points: the centre of the face, its corners, the middles of its edges, and the centre of each hole.
- Click the hole at the end of the arm nearest the base.
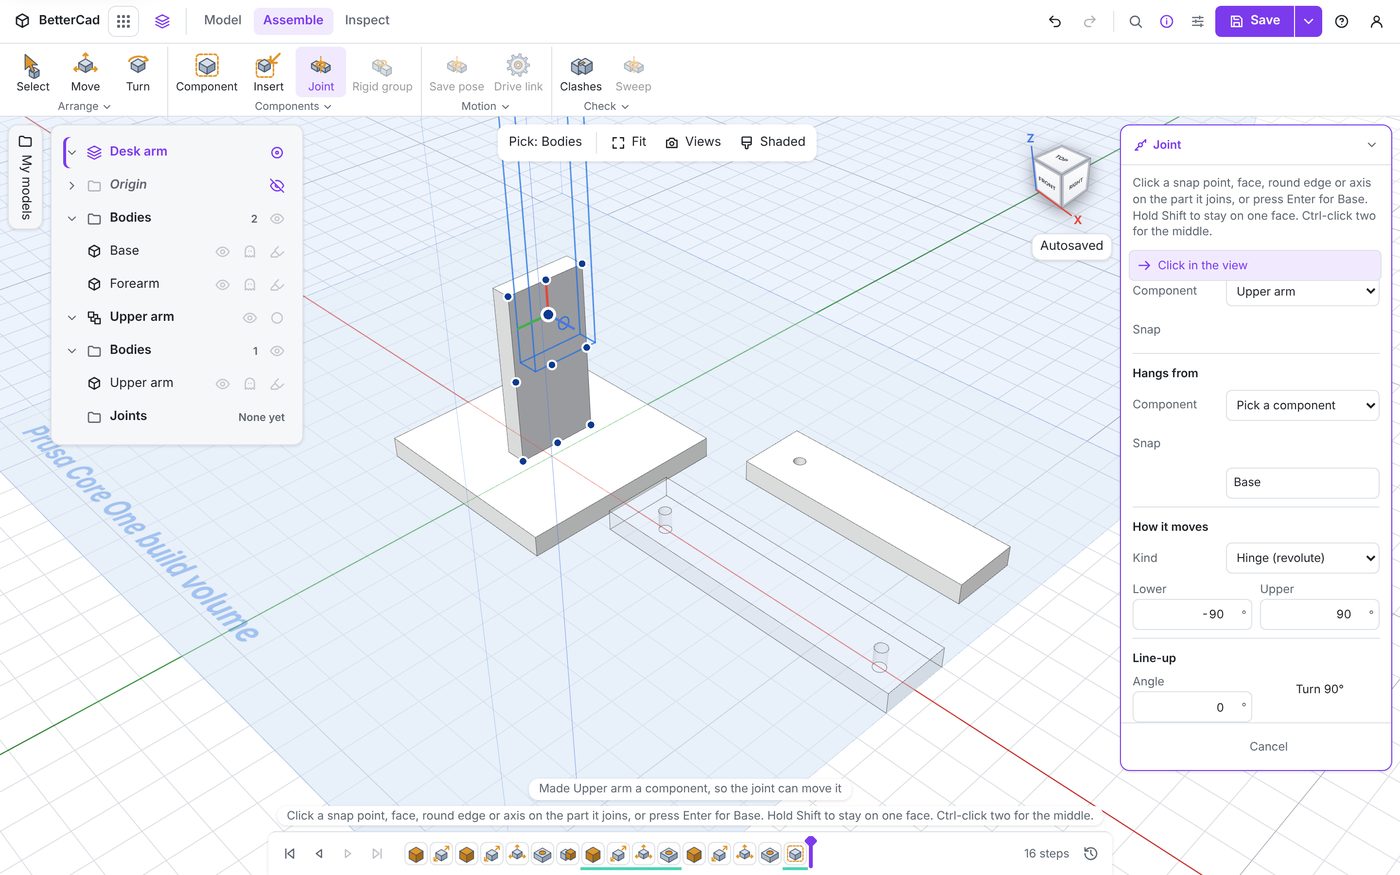
Two things happen. The bar says “Made Upper arm a component, so the joint can move it”, and in the Browser the arm moves out of Bodies into a component of its own. The panel’s Moves section now reads Upper arm, with the snap you picked.
Pick where it hangs
The bar now says “Click a snap point, face, round edge or axis on the part it joins”.
- Move the pointer over the upright on the base, on the face with the hole.
As you hover, the face lights up with its own snap points, and a faint outline of the arm appears by the base.
- Click the hole in the upright.
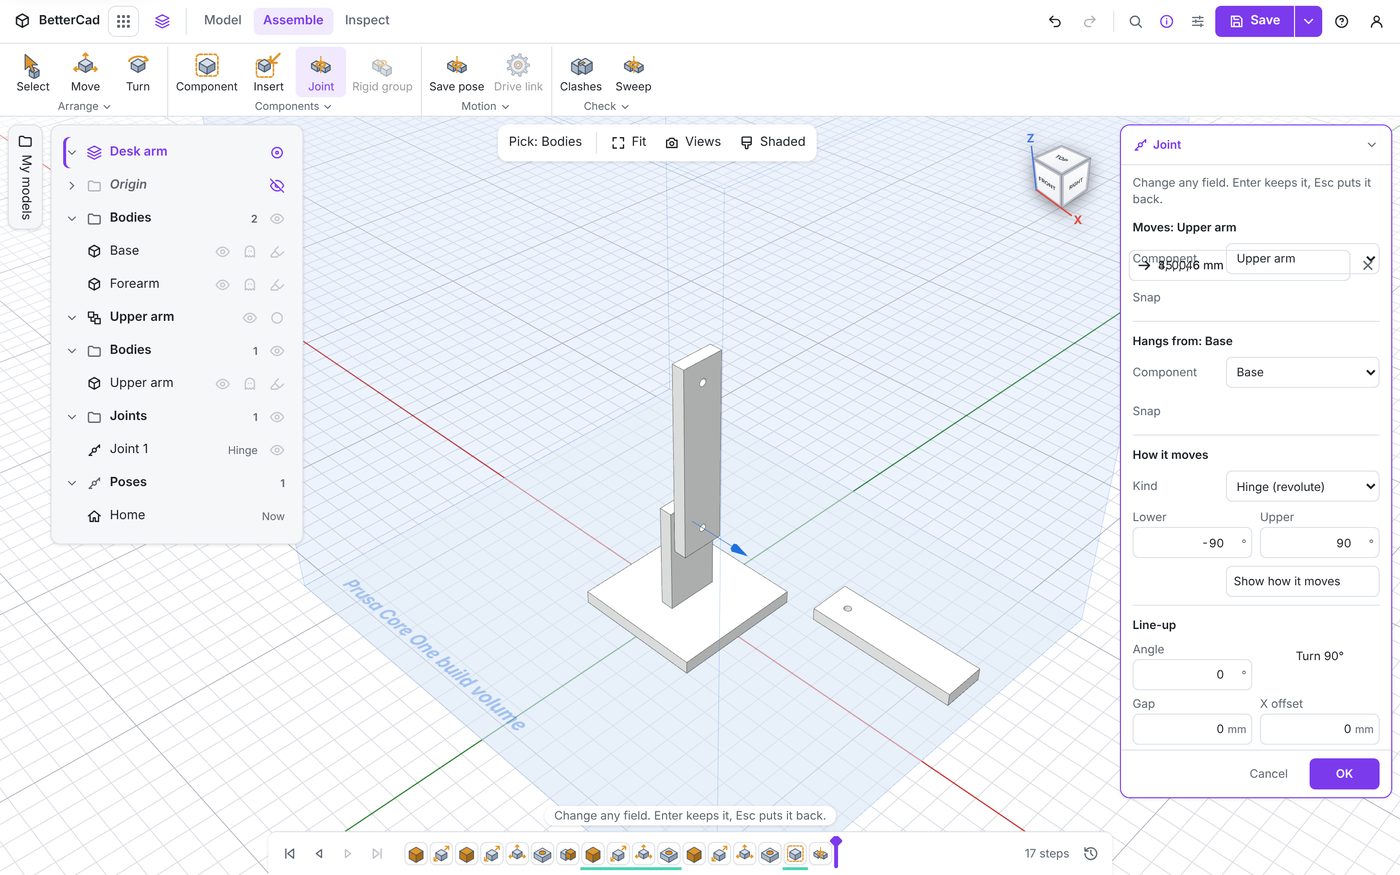
The arm jumps off the bed and onto the upright, hole to hole and face to face. It swings once through its range and back, so you can see which way it turns. A blue arrow marks the axle.
Read the panel
The panel has filled in:
| Section | What it says |
|---|---|
| Moves | The component that moves, and its snap |
| Hangs from | What it’s joined to, and that snap. Here it’s Base |
| How it moves | Kind is Hinge (revolute), with Lower at -90 and Upper at 90 degrees |
| Line-up | Angle, Gap, offsets and Flip, for adjusting how the two parts sit |
Everything can be changed while the panel is open, and again later. Click Show how it moves to watch the swing again.
- Click OK.
The bar says “Made Joint 1: hinge, Upper arm on Base”.
Name it
The Browser’s Joints folder now holds Joint 1, marked Hinge. A robot with six joints called Joint 1 to Joint 6 is no fun to work on, and the name goes into the URDF file too.
- Click Joint 1 in the Browser and press F2.
- Type
Shoulderand press Enter.
Face to face
BetterCad joined the two faces you clicked so they touch. That’s how most real joints work: a servo horn sits against an arm, a bearing sits against a plate.
It also means the face you click matters as much as the hole. If you’d clicked the hole on the underside of the arm, the arm would sit the other way up. The Flip setting in the next-but-two lesson fixes that without starting again.
Try it Yourself
- Press Ctrl+Z until the joint is gone, then make it again. It gets quicker.
- Make it once more, but this time click the hole at the far end of the upper arm first. What changes? Undo and put it back.
- While picking a snap, hold Shift. BetterCad stays on the face you’re on, which helps when faces are crowded together.
Common Issues
- Problem: The wrong snap point lights up
- Solution: Press Tab to step through the snaps near the pointer, or zoom in
-
Why: BetterCad offers the nearest snap first, and on a small part several are close together
- Problem: The Hangs from snap reads 0, 0, 0 and nothing moved
- Solution: Press Esc once and click the part again, a little away from the coloured axis lines
-
Why: When you pick where a part hangs, clicking one of the origin’s axis lines uses that line as the axle. It’s useful for a turntable at the centre of the bed, and a surprise the rest of the time
- Problem: OK is missing from the panel
- Solution: Check both Moves and Hangs from have a snap
- Why: OK only appears once the joint has everything it needs
Check your understanding
Quick quiz 1 of 3
What are the two clicks that make a joint?
Quick quiz 2 of 3
You clicked a plain body as the part that moves. What did BetterCad do to it?
Quick quiz 3 of 3
What does the blue arrow on a new joint show?
You can use the arrows ← → on your keyboard to navigate between lessons.
Comments