Flashing MicroPython
Put MicroPython firmware onto a Raspberry Pi Pico or ESP32 using the Snakie firmware flasher
By Kevin McAleer, 4 Minutes
Page last updated November 20, 2026

A brand new board doesn’t know any Python. It needs MicroPython itself, the firmware, copied onto it first. People call this flashing, and Snakie does it for you.
If your board already runs MicroPython you can skip to the next lesson, though it’s worth knowing how to update it.
Open the flasher
Click Flash firmware at the right of the status bar.
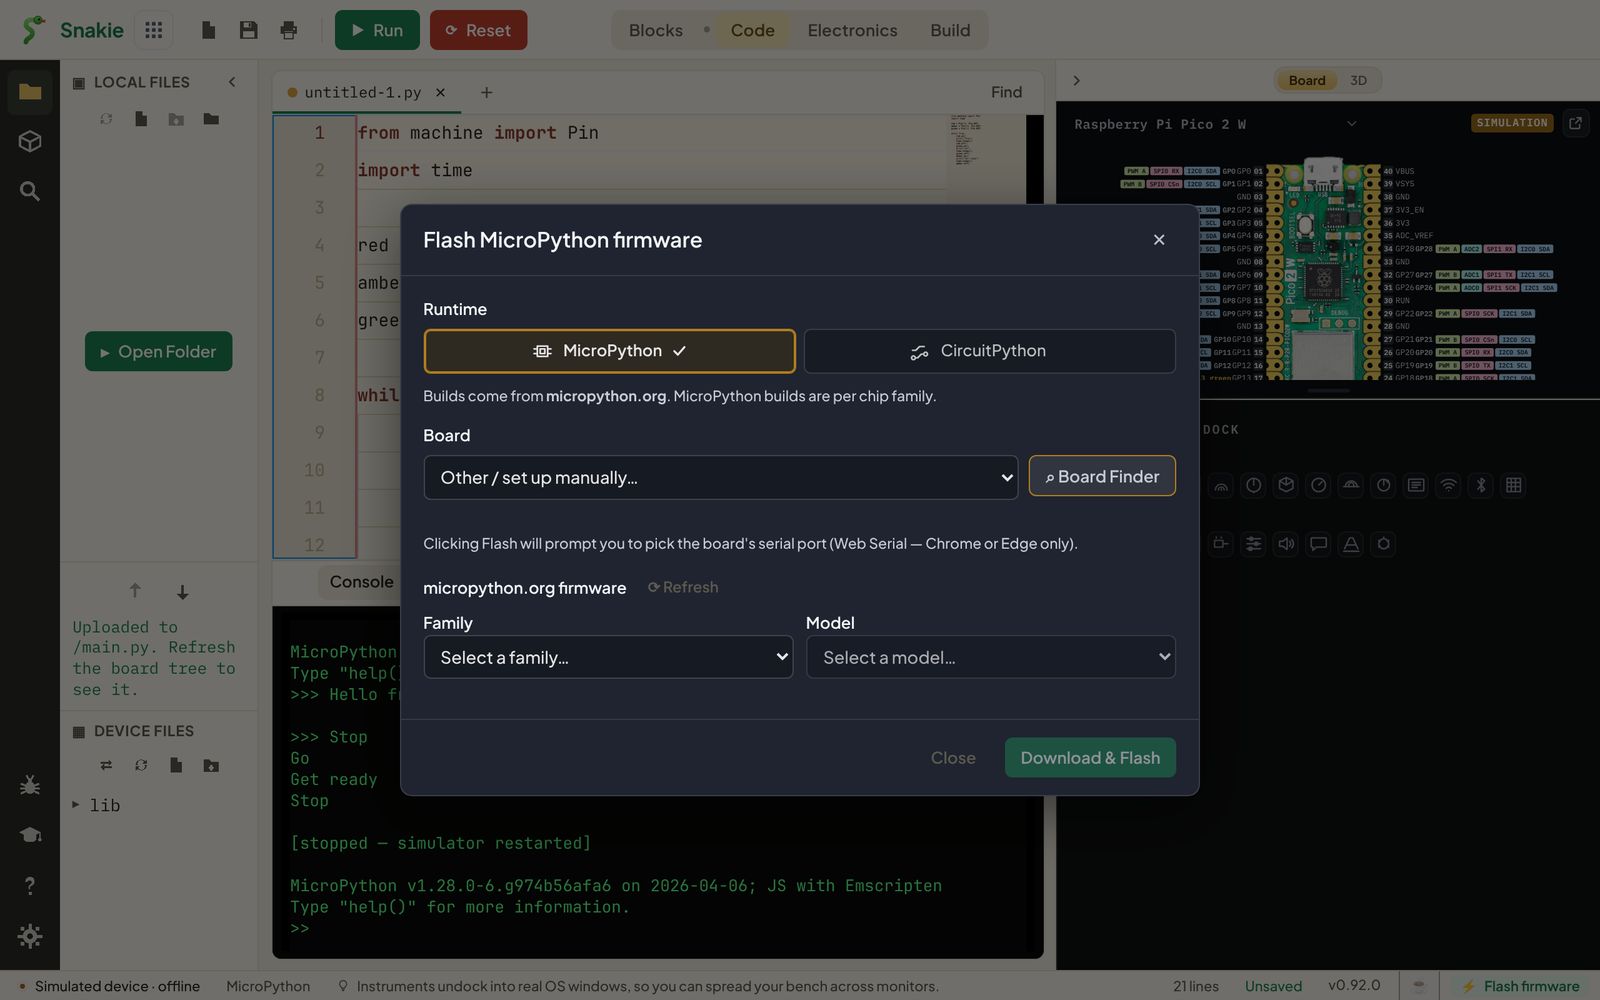
Step 1: Choose the runtime
The Runtime buttons at the top choose which Python you’re installing:
- MicroPython builds come from micropython.org, one per chip family
- CircuitPython builds come from circuitpython.org, one per board
This course uses MicroPython.
Step 2: Choose your board
Pick your board from the Board list, or click Board Finder to search for it as you did in the last lesson. Snakie fills in the Family and Model for you and offers the latest stable release.
Snakie only suggests stable releases. You can pick a nightly build from the version list on purpose, but it will never offer one.
Step 3: Put the board in bootloader mode
How you do this depends on the board.
Raspberry Pi Pico family
- Unplug the board.
- Hold down the white BOOTSEL button.
- Plug the USB cable in while still holding the button, then let go.
The board appears on your computer as a USB drive. It’s called RPI-RP2 on a Pico or Pico W, and RP2350 on a Pico 2 or Pico 2 W.
Other UF2 boards
Feathers, QT Py and XIAO boards usually need a quick double-tap of the RESET button. A drive appears with a name chosen by the maker, such as FEATHERBOOT.
ESP32 and ESP8266
There’s no drive. These boards are flashed over their serial port, so you’ll pick the port instead.
Step 4: Flash
Click Download & Flash.
- In the desktop app, Snakie detects the drive, downloads the firmware and copies it over. A progress bar and a log show what’s happening
- In the web app, Snakie talks you through it and then opens a save dialog. Choose the board’s drive, and the browser writes the firmware onto it. For an ESP32 it asks you to pick the serial port instead
When the copy finishes, the board restarts by itself and the drive disappears. That’s normal, and it’s how you know it worked. Click Done.
Check it worked
Connect to the board (the next lesson covers this in detail) and look at the first line in the console. You should see something like:
MicroPython v1.29.0 on <build date>; Raspberry Pi Pico 2 W with RP2350
That line tells you the MicroPython version and the board it was built for.
Updating later
When a board is connected, Snakie can check whether a newer MicroPython is available and offer the update from the same Flash firmware button. Flashing new firmware over old keeps the files on a Pico, but it’s good practice to keep copies of your code on your computer anyway.
Try it Yourself
- Put your board in bootloader mode and find its drive on your computer.
- Flash the latest MicroPython onto it.
- Challenge: open the Board Finder details for your board. How many builds does it list, and which is the default?
Common Issues
Problem: No drive appears when I hold BOOTSEL. Solution: Try another USB cable, and make sure you’re holding the button before the cable goes in. Why: Charge-only cables have no data wires, so the computer never sees the board.
Problem: The board works but WiFi doesn’t. Solution: Check you flashed the W build. A Pico W needs the Pico W firmware. Why: The plain Pico build has no driver for the radio.
Problem: On an ESP32 the desktop app says esptool is missing.
Solution: Install it once with pip install esptool.
Why: The desktop app uses Espressif’s own tool to write ESP firmware.
Check your understanding
Quick quiz 1 of 2
How do you put a Raspberry Pi Pico into bootloader mode?
Quick quiz 2 of 2
The drive disappears when the flash finishes. What does that mean?
You can use the arrows ← → on your keyboard to navigate between lessons.
Comments