KevsRobots Learning Platform
MeshCore Room Servers and Sensors
60% Percent Complete
Overview
The Room Server
The Sensor Node
Going Further
Building an Environment Sensor
Wire a BME280 to the Heltec V3 for temperature, humidity and pressure from a greenhouse or loft
By Kevin McAleer, 6 Minutes
Four wires and a £5 breakout, and your mesh can tell you whether the greenhouse went below freezing last night. This is the most satisfying build in the course.
The wiring
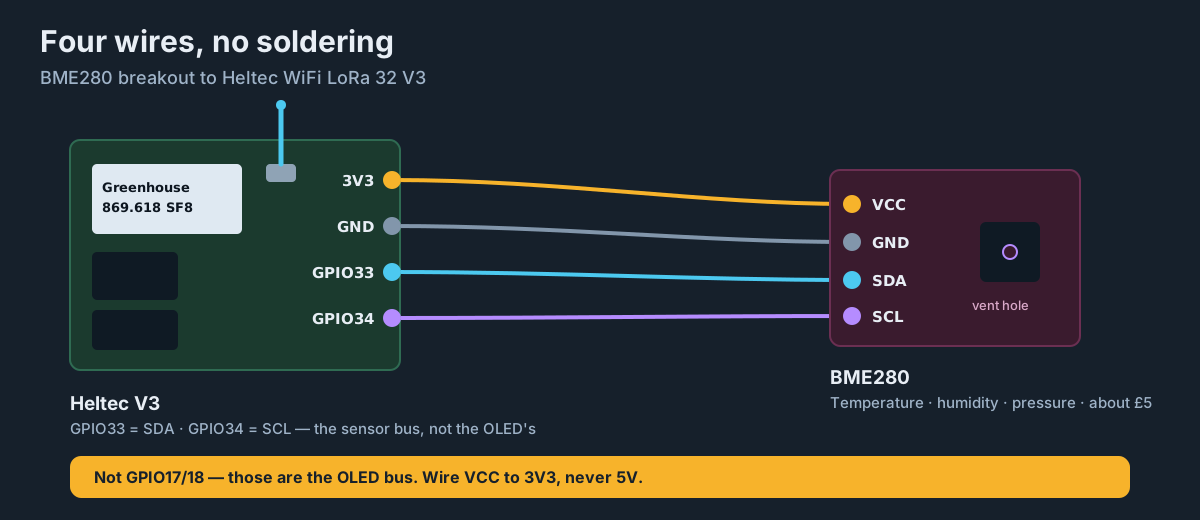
| BME280 pin | Heltec V3 pin | Wire colour convention |
|---|---|---|
| VCC / VIN / 3V3 | 3V3 | Red |
| GND | GND | Black |
| SDA / SDI | GPIO33 | Blue |
| SCL / SCK | GPIO34 | Yellow |
That is the entire build. Four Dupont jumpers, no resistors, no soldering if your breakout has a pre-fitted header.
Two things to check before you power up:
Voltage. Wire the breakout to 3V3, not 5V. Many BME280 modules include a regulator and tolerate 5V, but the ESP32-S3’s I2C lines are 3.3V logic, and a 5V-referenced bus can damage the microcontroller. 3V3 is always the safe answer here.
Pull-up resistors. I2C needs them, and essentially every BME280 breakout has them fitted on board. If you are using a bare chip rather than a breakout, you need 4.7kΩ pull-ups from SDA and SCL to 3V3.
Not the OLED’s pins
This is the one thing to get right. GPIO17 and GPIO18 are the OLED’s I2C bus. The sensor firmware scans a second, separate bus on GPIO33 and GPIO34.
Wire your BME280 to 17 and 18 - as most generic Heltec tutorials will tell you to - and everything will look correct, the board will boot happily, the screen will work, and sensor list will show nothing at all. It is a frustrating fault precisely because nothing appears broken.
On its own bus your BME280 sits at 0x76 or 0x77, selected by the SDO pin. With only one device on that bus there is nothing to clash with.
Power on and detect
With the sensor wired, power the board up and connect the console:
sensor list
You want to see the BME280 appear along with its readings. If it does not, work down the Common Issues at the end of this lesson.
Read a single value:
sensor get <key>
Use the key names exactly as sensor list reported them.
Where to put an environment sensor
The sensor measures the air immediately around it, which sounds obvious right up until your greenhouse reads 45°C because the board is in direct sun.
Do:
- Put it in shade, always. A sensor in sunlight measures the sunlight, not the air
- Get it away from the ground - a metre or so, out of the cold pooling layer
- Allow air movement around it. A sealed box reads the box, not the room
- Keep it away from your own electronics. The Heltec’s own regulator produces a little heat, and a sensor pressed against the board reads warm
Do not:
- Seal it inside a fully airtight enclosure if you want humidity readings that mean anything
- Put it next to a heater, a compost heap, or a south-facing wall
- Leave the bare board exposed to rain
The classic mistake: mounting the whole thing inside a black plastic box in a greenhouse. You get beautiful, consistent, entirely meaningless data about the inside of a black box.
A practical greenhouse build
- A small vented enclosure, or an upturned plant pot as a rudimentary radiation shield
- The Heltec V3 inside, antenna out through the top, vertical
- The BME280 on 15cm of wire, hanging below the enclosure in shade and free air
- A 3.7V LiPo on the SH1.25 connector
- Optionally a small solar panel - see the next lesson
Keeping the sensor on a short lead away from the board is worth doing. It gets the measurement away from the board’s own warmth and puts it in the air you actually care about.
Keep the lead short though. I2C is designed for centimetres, not metres. Under about 30cm is comfortable; a metre may work; several metres will not.
Reading the numbers sensibly
Temperature is the reliable one. Expect around ±1°C accuracy from a BME280, which is more than adequate for “did it freeze?”.
Humidity takes time to settle. Move the sensor from indoors to outdoors and it may take several minutes to stabilise. A step change in the reading is often the sensor catching up, not the weather.
Pressure is far more precise than it is accurate. The absolute figure may be off by a few hPa, but the trend is excellent - and the trend is what tells you weather is coming.
Self-heating is real. A BME280 sitting on a warm board reads high, often by a degree or two. This is the main argument for the short lead.
Try it Yourself
- Wire it up, run
sensor list, and confirm all three readings appear. - Breathe gently on the sensor and re-read. Humidity should jump and recover.
- Put the sensor in the fridge for five minutes - board outside, sensor on its lead inside - and watch temperature fall.
- Challenge: log the pressure reading morning and evening for a week and compare the trend against the forecast. Falling pressure and incoming weather line up remarkably well.
Common Issues
Problem: sensor list shows no BME280.
Solution: Check all four wires, confirm 3V3 not 5V, then reboot.
Why: Detection runs at boot only. A correct wiring job done after power-on looks identical to a broken one until you reset.
Problem: Everything looks right but sensor list is empty, and the screen still works fine.
Solution: Check you used GPIO33 and GPIO34, not GPIO17 and GPIO18.
Why: The OLED and the sensors are on different buses. A working screen tells you nothing about your sensor wiring, and the OLED bus is the one most tutorials name.
Problem: Temperature reads 2°C higher than a thermometer next to it.
Solution: Move the sensor away from the board, onto a short lead in free air.
Why: Self-heating from the board’s regulator and radio. It is the single most common cause of a sensor that reads plausibly but consistently high.
Problem: Humidity is pinned at 100%.
Solution: Check for condensation on the sensor, and let it dry out somewhere warm.
Why: A saturated sensing element reads 100% until the moisture leaves. It usually recovers; repeated soaking degrades accuracy permanently.
Problem: I get temperature and pressure but no humidity.
Solution: You have a BMP280, not a BME280.
Why: The two share a breakout footprint and a bus address. Both have a hole in the lid, so that is not the tell - the BME280 is square with a centred hole, the BMP280 rectangular with a corner one. In practice, missing humidity data is the diagnosis.
You can use the arrows ← → on your keyboard to navigate between lessons.
Comments