
From Code to Create Part 3: Going Wireless with the Pico W
Add WiFi to anything you build. In this episode of From Code to Creation we connect a Pico W to a network, host a local web server, and push live sensor data to the Arduino Cloud so you can see it from anywhere.
22 May 202619 minute read
By Kevin McAleer
Share this article on
Table of Contents
- Begin with the End in Mind
- Meet the Pico W
- The Post Office of the Internet
- Character 1 — DHCP (the Postman)
- Character 2 — The MAC Address (the Name on the Deed)
- Character 3 — The Default Gateway (the Front Gate of the Street)
- Character 4 — DNS (the Phone Book by the Front Gate)
- WiFi in Four Lines
- What each bit does:
- WiFi is the Road. What’s the Vehicle?
- HTTP — The Postal Service
- MQTT — A Radio Station
- Cloud SDKs — A Persistent Connection
- A Local Web Server in 30 Lines
- Pushing to the Cloud with Arduino Cloud
- Set up the Thing
- Install the prerequisites with MIP
- Copy the Arduino Cloud client onto the Pico
- The code
- See it on your phone
- Add WiFi to (Almost) Anything
- Three Gotchas That Will Eat Your Afternoon
- 1. 2.4 GHz only
- 2. Case-sensitive everything
- 3. [Errno 98] Address already in use
- Try It Yourself
- What’s Next?
- Drop Me a Comment
- Useful Links
From Code to Create Part 3: Going Wireless with the Pico W
Add WiFi to anything you build. In this episode of From Code to Creation we connect a Pico W to a network, host a local web server, and push live sensor data to the Arduino Cloud so you can see it from anywhere.
Video
For every project I create, I often make a corresponding YouTube video. Sometimes, there might be more than one video for a single project. You can find these videos in this section.
Explore more through this this dedicated video.
Ahoy there makers! Welcome to Part 3 of our From Code to Creation series. So far we’ve talked to a sensor over I2C and shown its readings on a tiny OLED screen. That’s brilliant — until you walk into the next room and can’t see the display anymore.
Today, we go wireless.
By the end of this guide, your Pico W will be reading sensor data, hosting a web page on your local network, and pushing live values to a cloud dashboard you can watch on your phone from anywhere in the world. Same code pattern works for a weather station, a cat flap monitor, a “is the kettle on?” alarm — anything you ever build with a Pico.
Here’s what we’ll cover:
- The one mindset shift that makes IoT projects easier (hint: start with the end)
- What’s actually inside a Pico W and how it differs from a regular Pico
- The four characters of every home network — explained with a post office
- Connecting to WiFi in just four lines of MicroPython
- Hosting a live sensor dashboard as a local web server
- Pushing data to the Arduino Cloud for a proper phone-friendly view
- The three gotchas that will eat your afternoon if you don’t know them
Let’s get going.
Begin with the End in Mind
Before we write a single line of code, here’s the question nobody asks at the start of a WiFi tutorial:
What do you actually want the data to do?
Sit on a webpage you check when you’re bored? Buzz your phone when humidity gets too high? Plot a chart you can scroll through on the train? Switch on a fan?
Each answer leads to a completely different bit of code. So before we start, pick yours. Today, I want to see my BME280 weather station’s readings on my phone, with a chart, from anywhere — not just on my home network. That choice means I’m reaching for a cloud platform.
The WiFi part is easy. The “what does it do” part is the interesting question.
Meet the Pico W
If you’ve been following along with a regular Raspberry Pi Pico, you’ll need to swap it for a Pico W. Same pins, same code, same MicroPython — just one extra chip on the board.
That little metal square on the Pico W is a CYW43439. It gives you:
- 2.4 GHz WiFi (not 5 GHz — remember this, it bites people)
- Bluetooth 5.2
- Built straight into the same form factor
Everything we wired up in episodes 1 and 2 — the BME280 sensor, the OLED display — works exactly as-is. We’re just adding a radio to the conversation.
The Post Office of the Internet
Before we touch any networking code, two minutes of fun. Because to put your Pico on a network, four little characters all have to play their part, and they all show up in one tiny function call.
Imagine your Pico W has just walked into a new town and needs to get on the road:
Character 1 — DHCP (the Postman)
When your Pico walks up to the router and says “I’d like to live here please,” DHCP hands it a house number. That’s your IP address — something like 192.168.1.50. It’s local. Only good on this street.
Character 2 — The MAC Address (the Name on the Deed)
This is burned into the WiFi chip at the factory and never changes. The router uses it to remember “ah yes, that’s the same Pico from yesterday, give it the same house number.”
IP = your house number (can change). MAC = the name on the deed (forever).
Character 3 — The Default Gateway (the Front Gate of the Street)
Want to talk to anything outside your local network — anything on the actual internet? You have to go through the gateway. Your router is also the gateway. It wears a lot of hats.
Character 4 — DNS (the Phone Book by the Front Gate)
Nobody wants to remember 142.250.187.78. You want to type arduino.cc. The Domain Name Server is the little book by the front gate that translates names into numbers.
That’s it. Postman, deed, gate, phone book. The Pico walks up, gets a house number from the postman, and the gate lets it out to the internet. And the wild thing is — one call to wlan.connect() does all four steps for you.
WiFi in Four Lines
Here’s the whole connection. No helper functions, no abstractions — just the four lines that do the four things we just talked about.
import network, time

wlan = network.WLAN(network.STA_IF)
wlan.active(True)
wlan.connect('YOUR_SSID', 'YOUR_PASSWORD')

while not wlan.isconnected():
    time.sleep(1)

print(wlan.ifconfig())
What each bit does:
STA_IF— “station mode,” fancy talk for “I’m a client on someone else’s network”active(True)— turns on the radioconnect(...)— asks DHCP for a house, talks to the gateway, sorts out DNSisconnected()— we loop until the network hands us a leaseifconfig()— prints the whole cast: IP, subnet, gateway, DNS
Run it. You’ll see something like:
('192.168.1.50', '255.255.255.0', '192.168.1.1', '192.168.1.1')
There they all are. House number. Street. Front gate. Phone book. Your Pico is officially a citizen of the internet.
WiFi is the Road. What’s the Vehicle?
This is the bit most tutorials skip — and it’s the bit that confuses people for months afterwards.
Getting onto WiFi just got you onto the road. The road doesn’t move data — it just lets you go places. To actually send something, you need a language. There are several:
HTTP — The Postal Service
You write a request, send it off, get a reply back, done. That’s what every browser on Earth speaks. Perfect for “fetch me a webpage.” This is what we’ll use for our local server.
MQTT — A Radio Station
The sensor publishes “temperature is 21.4” to a channel, and anyone tuned in hears it. Brilliant when you have lots of sensors shouting updates at lots of listeners without anyone caring who’s connected to whom. We’ll go deep on MQTT in Episode 7.
Cloud SDKs — A Persistent Connection
The Pico opens a line to a service, keeps it open, and they chat in both directions. This is what we’ll use to talk to the Arduino Cloud today. (Fun fact: most cloud SDKs are MQTT-over-TLS in a tuxedo under the hood.)
WiFi = the road. HTTP / MQTT / Cloud SDK = different vehicles for different jobs.
There’s one more thing worth knowing: where does the data live?
- If the Pico hosts the page, your phone has to be on the same WiFi to see it
- If the Pico pushes to a cloud service, your phone can be on the moon
We’re going to do both.
A Local Web Server in 30 Lines
A web server is just a program that picks up the phone when a browser calls. MicroPython’s socket module is the phone. The language we speak through it is HTTP — that’s why every response we send starts with HTTP/1.0 200 OK. We’re literally writing the protocol by hand. Big libraries hide this; let’s see it raw, once, so you know what’s underneath.
import network, socket, time
from machine import Pin, I2C
from bme280 import BME280

# Connect to WiFi
wlan = network.WLAN(network.STA_IF)
wlan.active(True)
wlan.connect('YOUR_SSID', 'YOUR_PASSWORD')
while not wlan.isconnected():
    time.sleep(1)
ip = wlan.ifconfig()[0]

# Sensor on the I2C bus from Episode 1
bme = BME280(i2c=I2C(0, scl=Pin(1), sda=Pin(0)))

# Open a socket and listen on port 80
s = socket.socket()
s.setsockopt(socket.SOL_SOCKET, socket.SO_REUSEADDR, 1)
s.bind(('0.0.0.0', 80))
s.listen(1)
print(f'http://{ip}')

while True:
    cl, _ = s.accept()
    cl.recv(1024)
    t, h, p = bme.temperature, bme.humidity, bme.pressure
    html = f"""<!DOCTYPE html><html>
<head><meta http-equiv="refresh" content="5">
<style>body
h1.r</style></head>
<body><h1>Pico W</h1>
<div class="r">Temp: {t}</div>
<div class="r">Humidity: {h}</div>
<div class="r">Pressure: {p}</div></body></html>"""
    cl.send('HTTP/1.0 200 OK\r\nContent-Type: text/html\r\n\r\n')
    cl.send(html)
    cl.close()
That’s the whole thing:
- Pick up the phone (
accept) - Read what they said (
recv) - Build a page with fresh sensor values
- Send it back with an HTTP header
- Hang up (
close)
The <meta http-equiv="refresh" content="5"> tag is the only trick — the browser reloads itself every 5 seconds. No JavaScript needed. Cheap and cheerful.
Run it, type the printed IP address into your phone’s browser, and you’ve got a live sensor dashboard.
But — you’re still on the same WiFi as the Pico. Walk out the front door, switch to cellular, and the page disappears. Which brings us to the actual goal.
Pushing to the Cloud with Arduino Cloud
To see data from anywhere, we need a service on the public internet that the Pico pushes to, and the phone pulls from. There are loads of options — Adafruit IO, ThingsBoard, Home Assistant Cloud — but we’re picking Arduino Cloud today because:
- The dashboard is genuinely lovely
- There’s a free tier
- There’s a polished phone app you don’t have to write
- The pattern transfers to literally any other platform
Set up the Thing
Head over to cloud.arduino.cc, sign in, and:
- Create a new Thing
- Add three Variables:
temperature,humidity,pressure(all Float, Read-only, Periodic 10s) - Add a Device — pick “Manual device” — and save the Device ID and Secret Key somewhere safe. You only see the secret key once.
Heads-up: keep that secret key out of any screen recordings, GitHub commits, or screenshots. Treat it like a password.
Install the prerequisites with MIP
The arduino-iot-cloud client is a small library that leans on a handful of other libraries to do the heavy lifting — talking MQTT, packing data efficiently for the wire, and so on. We have to install those onto the Pico first.
The tool for that is MIP — MicroPython Install Package. Think of it as pip but trimmed down to work on a tiny microcontroller. It runs on the Pico itself, fetches packages from the MicroPython library index over WiFi, and drops them into /lib.
Crucially, MIP needs the Pico to be on WiFi first, because it has to download the packages. So a one-shot installer script that connects, then installs, is the cleanest pattern. Save this as install_requirements.py on your Pico and run it once:
import network, time
from secrets import WIFI_SSID, WIFI_PASSWORD

# WiFi must be up before MIP can fetch anything
wlan = network.WLAN(network.STA_IF)
wlan.active(True)
wlan.connect(WIFI_SSID, WIFI_PASSWORD)
while not wlan.isconnected():
    time.sleep(1)
    print("Connecting...")
print("Connected:", wlan.ifconfig())

def install_packages():
    import mip
    packages = [
        "logging",        # standard logging API the cloud client uses
        "cbor2",          # compact binary format for sending values
        "senml",          # the data schema Arduino Cloud expects
        "umqtt.simple",   # the actual MQTT client
        "umqtt.robust",   # adds reconnect logic on top of umqtt.simple
    ]
    for pkg in packages:
        try:
            print(f"Installing {pkg}...")
            mip.install(pkg)
        except Exception as e:
            print(f"  Failed: {e}")

install_packages()
A few notes on what’s happening:
-
secrets.py— keep your SSID, password, and Arduino Cloud creds in a tinysecrets.pyfile on the Pico:WIFI_SSID = "..." WIFI_PASSWORD = "..." DEVICE_ID = "..." # from the Arduino Cloud Thing SECRET_KEY = "..." # only shown once when you make the deviceThen never commit that file to GitHub. The cloud code below imports from it, so anything you keep in here stays out of your scripts (and out of screen recordings, screenshots, copy-paste mishaps…). Future-you will thank you.
-
Five packages, one shot. You only have to run this script once per fresh Pico. After that, the libraries live in
/libon the flash andimportwill find them every time.
If you skip this step, the next code block will crash on its very first import with something like ImportError: no module named 'cbor2'. The fix is always the same — run install_requirements.py first.
The full script lives in the companion repo alongside the rest of this episode’s code.
Copy the Arduino Cloud client onto the Pico
MIP can fetch the dependencies you just installed, but the arduino_iot_cloud library itself isn’t on the MicroPython package index. That sounds annoying — it isn’t. It just means you copy the folder onto the Pico manually, once, and you’re done.
In the companion repo there’s a folder called arduino_iot_cloud/ containing four files:
arduino_iot_cloud/
├── __init__.py     # the ArduinoCloudClient class you import
├── ucloud.py       # state-syncing engine
├── umqtt.py        # MQTT plumbing tweaked for this client
└── ussl.py         # TLS helpers
Copy that whole folder into /lib/ on the Pico. There are three flavours of “copy” depending on the tool you like:
- Thonny — open the Files panel (View → Files), navigate into
/libon the Pico side (create it if it doesn’t exist), then drag thearduino_iot_cloudfolder over from your computer. mpremote(command line, my favourite) —mpremote cp -r arduino_iot_cloud :/lib/rshell—rsync arduino_iot_cloud /pyboard/lib/arduino_iot_cloud
Either way, when you’re done your Pico’s filesystem should look something like:
/
├── main.py
├── secrets.py
├── bme280_float.py
├── install_requirements.py
└── lib/
    ├── arduino_iot_cloud/   ← the folder you just copied
    ├── cbor2/               ← installed by MIP
    ├── senml/               ← installed by MIP
    ├── umqtt/               ← installed by MIP
    └── logging.py           ← installed by MIP
/lib is on MicroPython’s import path by default, so from arduino_iot_cloud import ArduinoCloudClient in your next script will Just Work.
The code
import network, time
from machine import Pin, I2C
from bme280 import BME280
from arduino_iot_cloud import ArduinoCloudClient
from secrets import WIFI_SSID, WIFI_PASSWORD, DEVICE_ID, SECRET_KEY

# WiFi
wlan = network.WLAN(network.STA_IF)
wlan.active(True)
wlan.connect(WIFI_SSID, WIFI_PASSWORD)
while not wlan.isconnected():
    time.sleep(1)

# Sensor
bme = BME280(i2c=I2C(0, scl=Pin(1), sda=Pin(0)))

# Cloud
client = ArduinoCloudClient(
    device_id=DEVICE_ID.encode(),
    username=DEVICE_ID.encode(),
    password=SECRET_KEY.encode(),
)

def on_temp(c):  return bme.temperature
def on_hum(c):   return bme.humidity
def on_pres(c):  return bme.pressure

client.register('temperature', value=None, on_read=on_temp, interval=10)
client.register('humidity',    value=None, on_read=on_hum,  interval=10)
client.register('pressure',    value=None, on_read=on_pres, interval=10)

client.start()
Three little blocks of code:
- WiFi — same four-line dance we already learned
- Sensor — exactly what we used in Episode 2
- Cloud — point the client at your credentials, and tell it “every 10 seconds, call this function, push the result to that variable”
The arduino-iot-cloud library handles the rest: secure websockets, reconnects, time-stamps, the lot.
See it on your phone
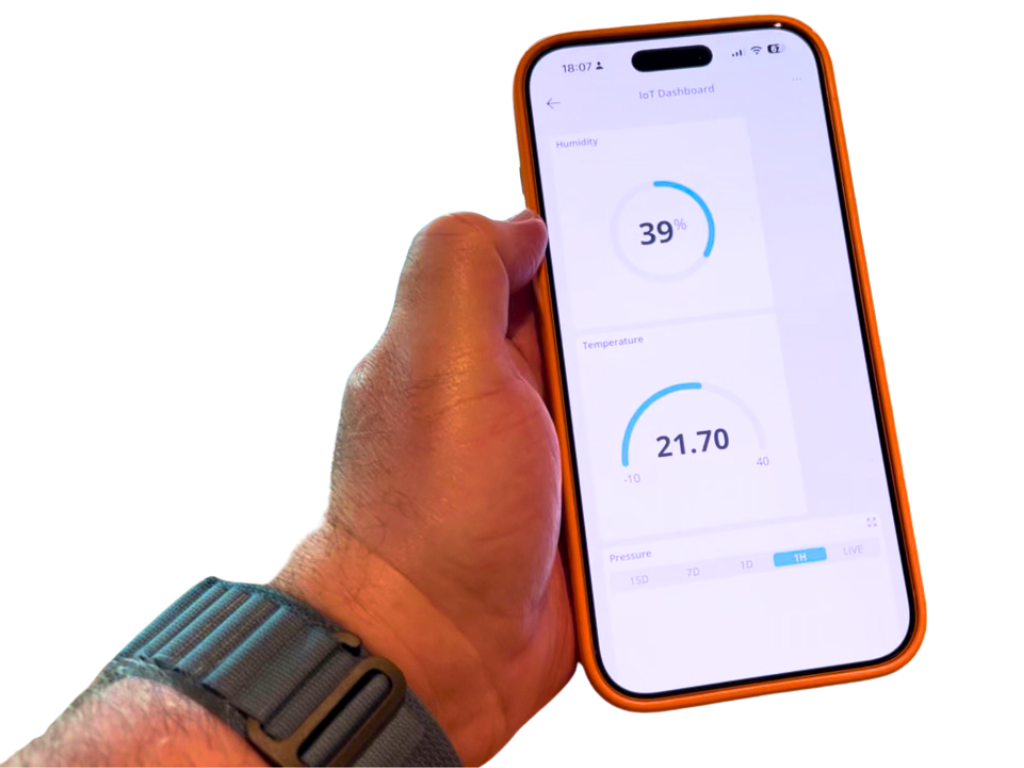
Run the script. Then, on your phone, install the Arduino IoT Cloud Remote app, log in, and open your Thing’s dashboard. Drag a chart widget onto the temperature variable. Watch the line draw itself in real time.
Now for the magic moment: turn off WiFi on your phone. The chart keeps updating, because the data isn’t coming from your router any more — it’s coming from the internet.
That’s the point where WiFi goes from “fun trick” to “actually useful.”
Add WiFi to (Almost) Anything
Here’s the bit nobody tells you. The pattern you just wrote — read a thing, push to the cloud, see it on your phone — works for anything.
- Cat flap monitor — reed switch on the door, push “open / closed” to the cloud
- Is the kettle on? — current sensor near the kettle, push the wattage
- Mailbox notification — tilt switch in the mailbox, push a “you’ve got post” event
- Plant needs water — soil moisture probe, push the reading; chart it over a week
- Garage door open? — distance sensor on the ceiling, push “open / closed”
Every one of those is the same code. Swap the sensor. Change the variable name. Done.
Once you’ve added WiFi once, you’ve added it forever. Everything you build from now on can live on the internet by Tuesday.
Three Gotchas That Will Eat Your Afternoon
These three will catch you out at some point. Save yourself the hour and read them now.
1. 2.4 GHz only
The Pico W’s radio does not speak 5 GHz. If your router is dual-band and the 5 GHz network shares a name with the 2.4 GHz one, the Pico will sit there looking confused. Most routers let you split them with a different SSID for each band — do that.
2. Case-sensitive everything
Home_WiFi is not the same as home_wifi. Both your SSID and your password are case-sensitive. Copy-paste them out of your router’s admin page — don’t retype them.
3. [Errno 98] Address already in use
If your local web server crashes or you restart the script, the port stays locked for about a minute. The fix is one line:
s.setsockopt(socket.SOL_SOCKET, socket.SO_REUSEADDR, 1)
We included it in the code above. Without it you’ll think your Pico is broken — it isn’t, you’re just waiting for the OS to release the socket.
Try It Yourself
Once your dashboard is running, try these:
- Add a fourth variable — calculate “feels like” temperature from temperature + humidity and push that as well
- Trigger a phone notification when temperature crosses a threshold (the Arduino Cloud dashboard lets you do this in the UI — no extra code)
- Display the current temperature on the OLED from Episode 2, alongside the cloud push
- Stick a tilt switch on something — your mailbox, your garage door, your fridge — and push an “open / closed” boolean to the cloud
- Compare two rooms — wire up a second Pico W in another room with the same code, and chart them on the same dashboard
What’s Next?
Right now, your weather station works beautifully — until the power blinks. Then all that lovely data is gone, and the cloud chart resets to “today only.”
In Episode 4, we’re going to fix that with files, JSON, and a proper little data logger that survives a reboot. Your Pico will start remembering things, even after a power cut.
See you in the next one!
Drop Me a Comment
The silliest thing you’d add WiFi to — what is it? Pop it in the comments under the video. The best one, I’ll actually build in a future episode.
Useful Links
- MicroPython
networkmodule documentation - MicroPython
socketmodule documentation - Arduino IoT Cloud Python client (GitHub)
- Arduino Cloud sign-up
- Raspberry Pi Pico W documentation
- Previous Episode (Part 2): OLED Displays
- Series Launch Post: From Code to Creation
- Full MicroPython learning pathway
This page is awesome - Show some love!



Comments