Getting started with projects
This guide walks you through your first project, from an empty page to a write-up other makers can follow. You don’t need to know Markdown to start: most things have a button, and the editor shows the result as you type.
On this page
- Start a project
- Add your parts: the Bill of Materials
- Find parts in the catalog
- Add a part that isn’t in the catalog
- Draw the wiring diagram
- Write the assembly instructions
- Tables
- Callouts
- Publish it, then keep working
Start a project
Log in, then click Create New in the Projects bar. You get an empty project in the editor.
- Type a title at the top. A clear name (“Line Follower Bot”, not “My robot”) helps people find it.
- Add a short description: one line that says what it does.
- Set the difficulty, the build time in minutes and a few tags, such as
picoor3d-printing. - Click into the page under the toolbar and start writing.
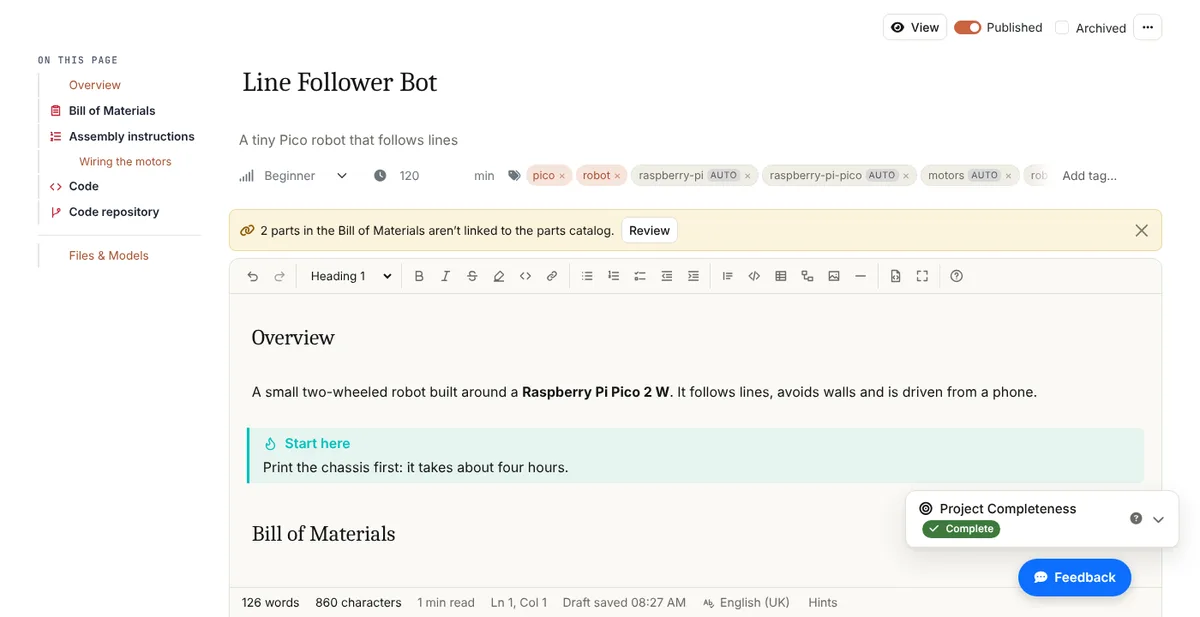
Your work saves as you go. The On this page list on the left fills in from your headings, and the Project completeness box in the corner lists what’s left to add.
The
/menu is the quickest way in. Type/at the start of an empty line to add a section (Bill of Materials, Assembly instructions, Wiring diagram, Gallery, Videos), a part, a file or a diagram. Keep typing to narrow the list, then press Enter.
The ? button at the end of the toolbar opens the Markdown guide: a short reference for everything the editor can do.
Add your parts: the Bill of Materials
The Bill of Materials is the list of parts someone needs to buy or print to build your project. It’s a table under a heading called Bill of Materials.
- On an empty line, type
/and pick Bill of Materials. - The editor adds the heading and a table with Part, Qty, Price, Total and Notes columns, with the first part name ready to type over.
- Type the part’s name, press Tab to move to Qty, and Tab again for Price.
- Click the + under the table to add another row.
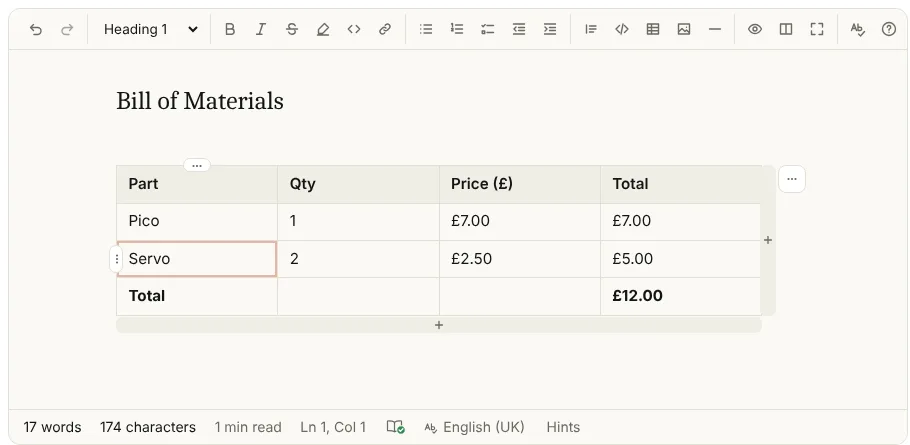
A few things are done for you:
- Totals. With Qty and Price columns, each row’s Total and the Total row at the bottom are worked out as you type.
- Prices. Write prices with a dot (
4.99). Pick a currency from the Price column’s menu (the small…above it) and every price is shown in it, so4becomes£4.00. - Quantity. Click a Qty cell and use its up and down arrows, or Alt+Up and Alt+Down.
Link each part to the catalog
A plain part name is fine, but a part linked to the catalog shows its picture, its details and where to buy it. Readers can hover over it to see a card, and the wiring diagram can draw it with its real pins.
- Click in the part’s cell and type
/then Part. - Start typing the part’s name. Matching parts from the catalog appear with their pictures.
- Pick one. The cell becomes a link to that part, and if the catalog has a price for it, the editor offers to fill in the Price.
If some parts aren’t linked yet, a yellow bar above the editor says how many. Click Review to go through them.
Find parts in the catalog
The Parts Catalog is a shared list of the parts makers use in their projects, with photos, pinouts, specifications and shop links.
- Search by name, part number, maker or tag in the box at the top.
- Browse by category: each one is a shelf. Click Show all to see the whole category.
- Filter on the left by manufacturer, by status (Verified, Draft) or to show only parts with a price.
Click a part to open its page. It has an Overview with specifications and pinout, the Symbol used in diagrams, Photos, the edit history under Versions, and Talk for questions about the part.
Pick several parts at once
From the editor, type / then Part on an empty line outside the table and choose Browse the catalog… at the bottom of the list. Tick the parts you need and click Add to Bill of Materials: each one gets its own row, already linked.
Add a part that isn’t in the catalog
If your part isn’t there yet, you can add it. It helps the next maker too.
When a row in your Bill of Materials isn’t linked, hover over its name and click New part.
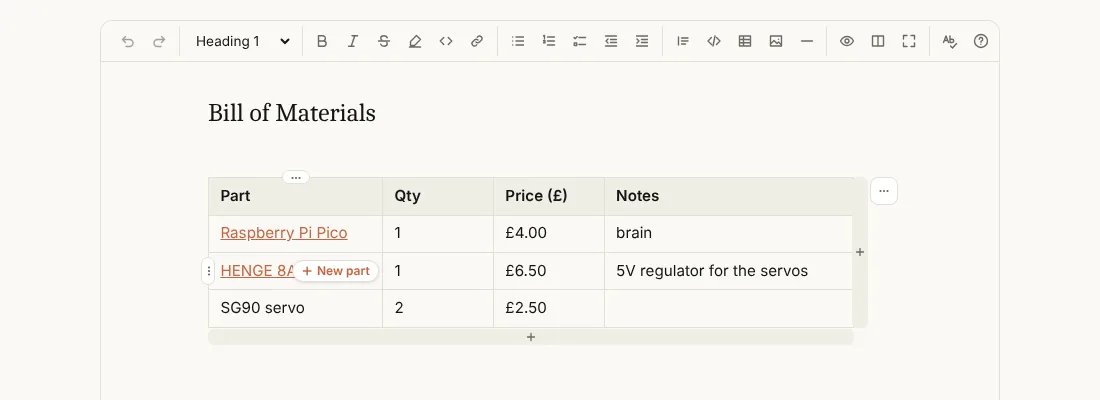
The Add a part to the catalog box opens with the name from your table filled in.
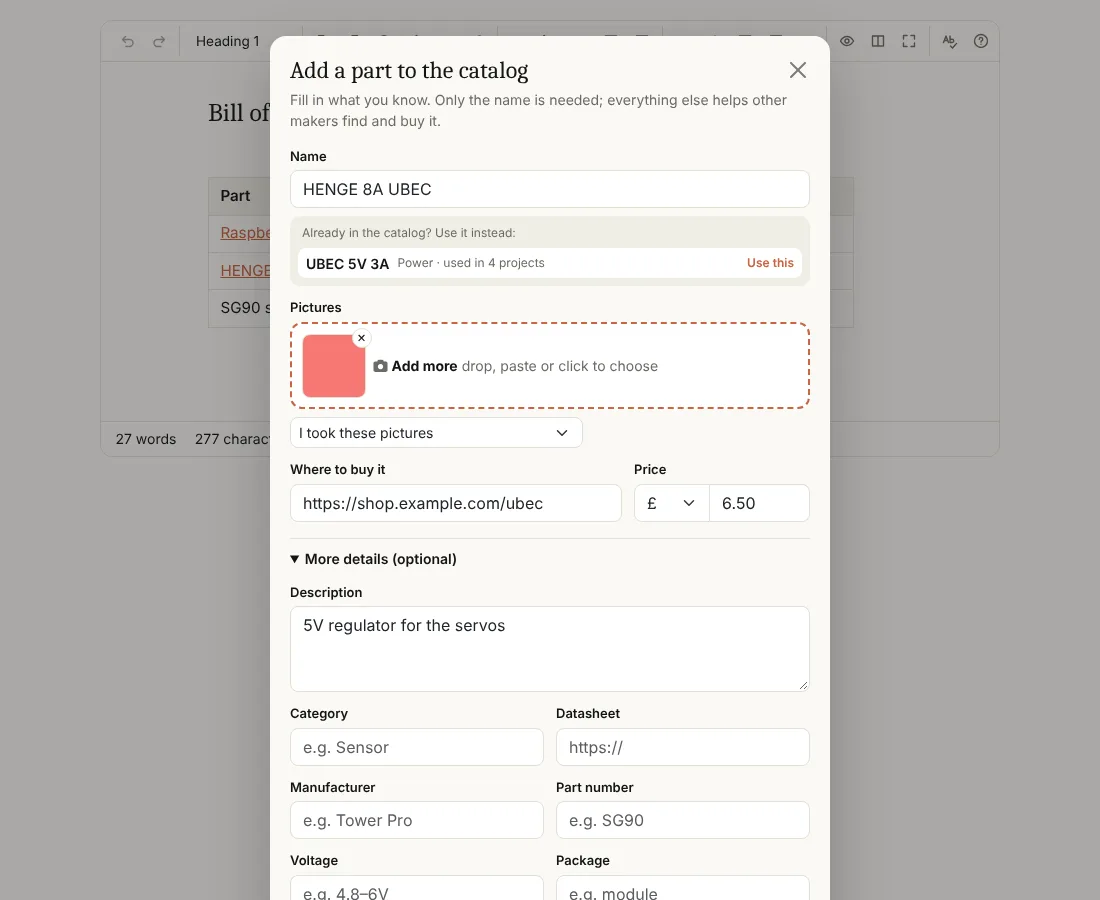
- Check the name. If a similar part is already in the catalog, it’s listed under the name: click Use this to link to it instead.
- Add pictures: drop, paste or click to choose. Say who took them, so the right licence goes with them.
- Fill in Where to buy it and the Price if you know them.
- Open More details to add a description, category, datasheet, manufacturer and part number. Only the name is needed.
- Click Add part. Your table row is linked to the new part.
You can also type / then Part in a cell, type the name, and choose Create “…” at the bottom of the list. New parts can be used in your project straight away, and join the catalog for everyone once they’ve been checked.
Draw the wiring diagram
The wiring workspace draws your parts with their real pins, and you wire them up by dragging between pins. It uses the parts in your Bill of Materials, so add those first.
- Give your project a title (the wiring is saved with the project).
- On an empty line, type
/and pick Wiring diagram. The editor adds a Wiring heading and opens the workspace in the page.
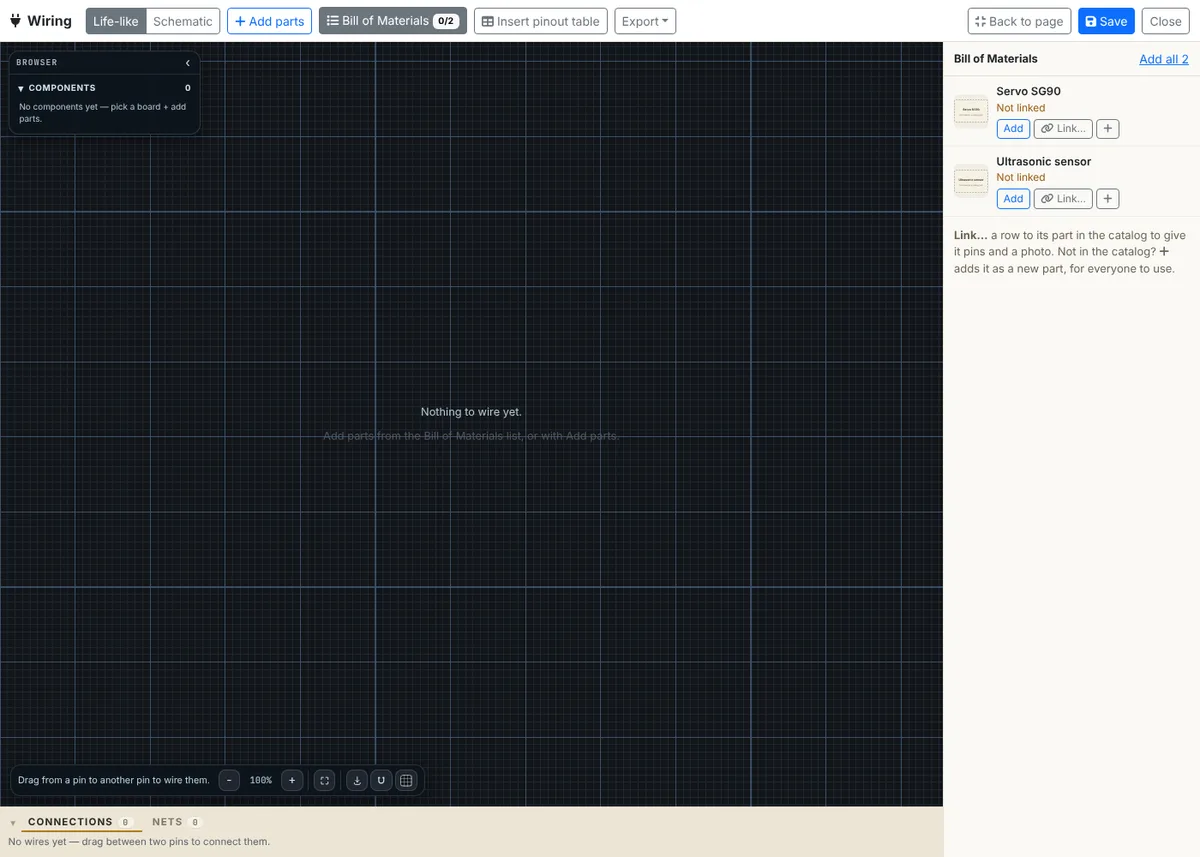
The Bill of Materials panel on the right lists every row of your table:
- Add puts that part on the canvas. Add all puts them all on.
- A part linked to the catalog is drawn as its photo with its pins. Your microcontroller (a Pico, say) becomes the board.
- A part that isn’t linked yet shows as a plain card. Click Link… to find it in the catalog, or + to add it as a new part.
- A catalog part with no pins yet gets an Edit part button, where you can add its pins.
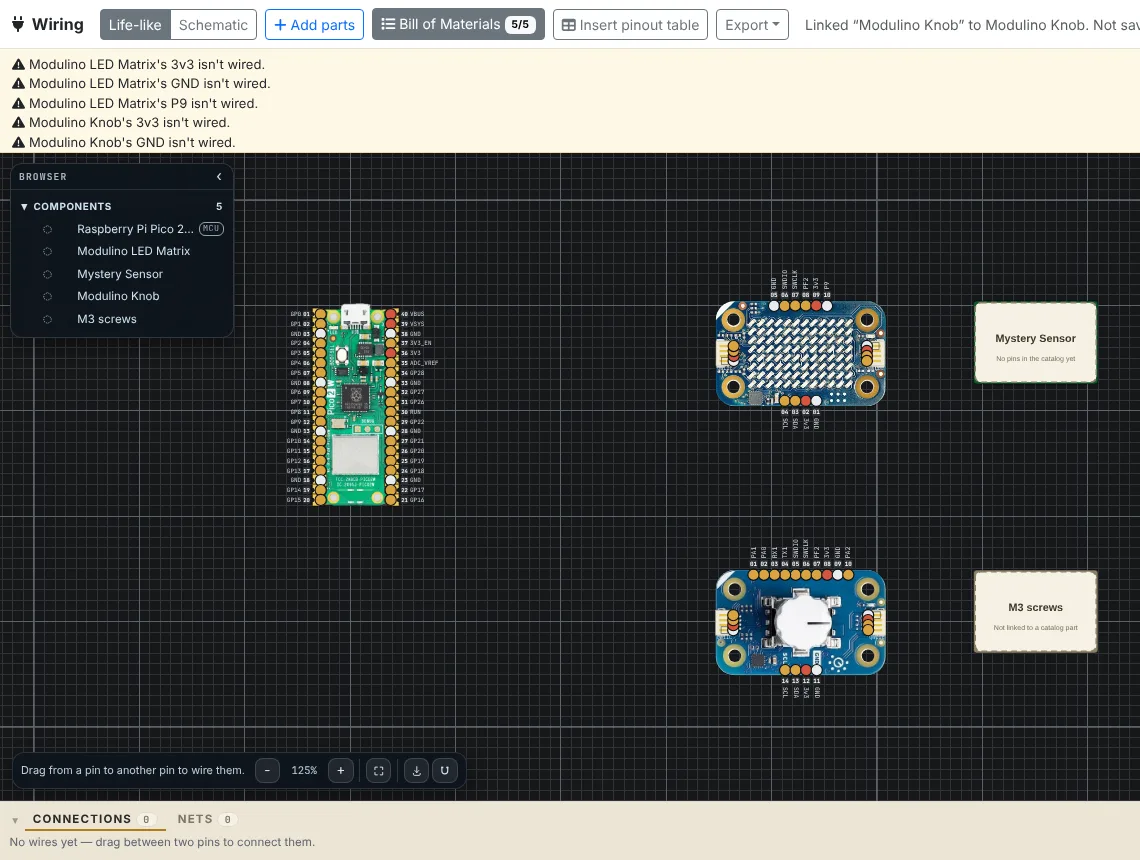
To wire it up:
- Drag from one pin to another to connect them. The connections are listed under the canvas.
- Switch between Life-like and Schematic at the top to change the drawing style.
- Use Add parts to bring in a part from the catalog. It’s added to your Bill of Materials too.
- Warnings, such as a pin that isn’t wired, appear across the top. They’re only a reminder: you can save anyway.
- Click Save. The drawing is placed in your page under the Wiring heading.
Click Full screen for more room (Esc brings you back), and Pinout (Insert pinout table in full screen) to add a table of every connection under the diagram. Export saves the drawing as an SVG or PNG. To change the wiring later, hover over the diagram in the editor and click Edit wiring.
Write the assembly instructions
This is the part readers come for: how to build it, one step at a time.
- On an empty line, type
/and pick Assembly instructions. The editor adds the heading and starts a numbered list. - Write one action per step, and press Enter for the next number.
- For a longer build, break it into stages with smaller headings (
## Fit the motors,## Wire the sensor). They show in the On this page list, so readers can jump to a stage.
Some tips that make instructions easier to follow:
- Add a picture to each step. Drag a photo onto the page, or paste it, and it’s uploaded where you drop it. Click a picture to give it a title (shown as a caption), change its size (Full, Half, Cover or Small) or swap it for another.
- Label your photos. Click a picture and choose Draw on it to add arrows, numbers and labels over it.
- Link the parts you mention. Type
/then Part in the middle of a sentence to link to a part from your Bill of Materials. - Point out the tricky bits with a callout (see Callouts below), such as a warning before you solder or a tip that saves time.
- Split a very long build into pages. Type
/then Page break between two sections. Readers get Previous and Next buttons, and can still choose to read it as one page.
A short example of how a step looks in Markdown:
# Assembly instructions
## Fit the motors
1. Push the two N20 motors into the chassis, wires facing in.
2. Screw the motor brackets down with four M2 screws.
{half}
> [!warning] Mind the polarity
> Check both motors turn the same way before you solder the wires.
Tables
Tables are handy for anything with rows and columns: pin connections, settings, print settings or a parts list.
To add one, click the table button on the toolbar, or type / then Table. You can also type it yourself:
| Pin  | Connects to | Notes        |
| ---- | ----------- | ------------ |
| GP0  | Motor A in1 | PWM          |
| GP1  | Motor A in2 |              |
Once it’s in the page, click any cell to edit the table directly:
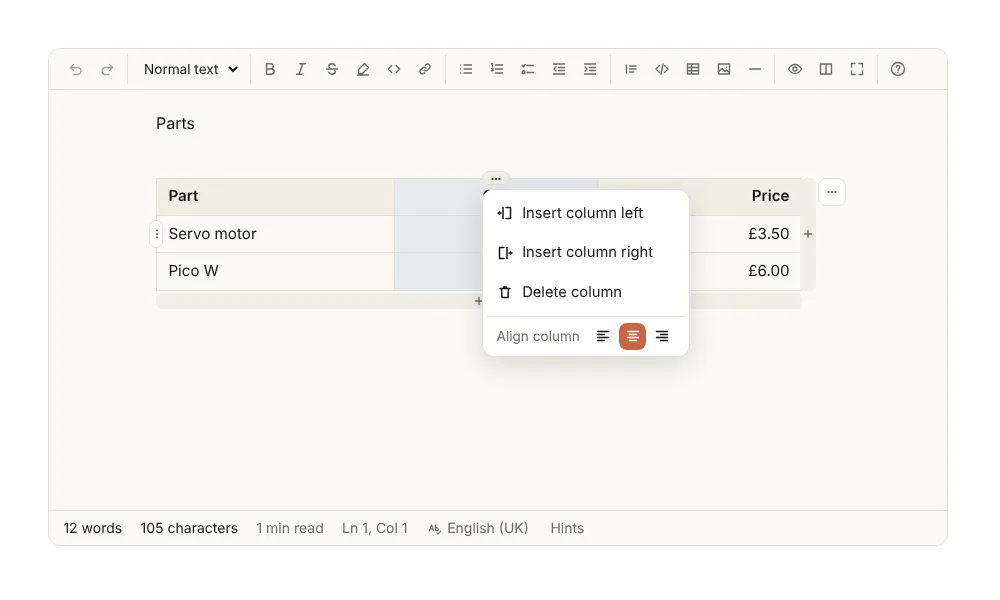
- Tab moves to the next cell. + to the right adds a column, + underneath adds a row.
- The
…above a column opens its menu: insert a column left or right, delete it, or align it left, centre or right. - The handle at the start of a row opens the row menu: insert or delete rows, or Split table here.
- Drag a row or column by its handle to move it.
- Select text in a cell to get a small formatting bar for bold, italics and links. Shift+Enter starts a new line in the same cell.
Callouts
A callout is a coloured box that makes a note stand out from the text around it: a warning, a tip, or something to check before carrying on.
On an empty line, type / then the kind you want, such as Tip callout or Warning callout. Or type it yourself:
> [!tip] Print the chassis first
> It takes about four hours, so start it before you do the wiring.
The first line sets the type and the title. Every line under it starts with >.
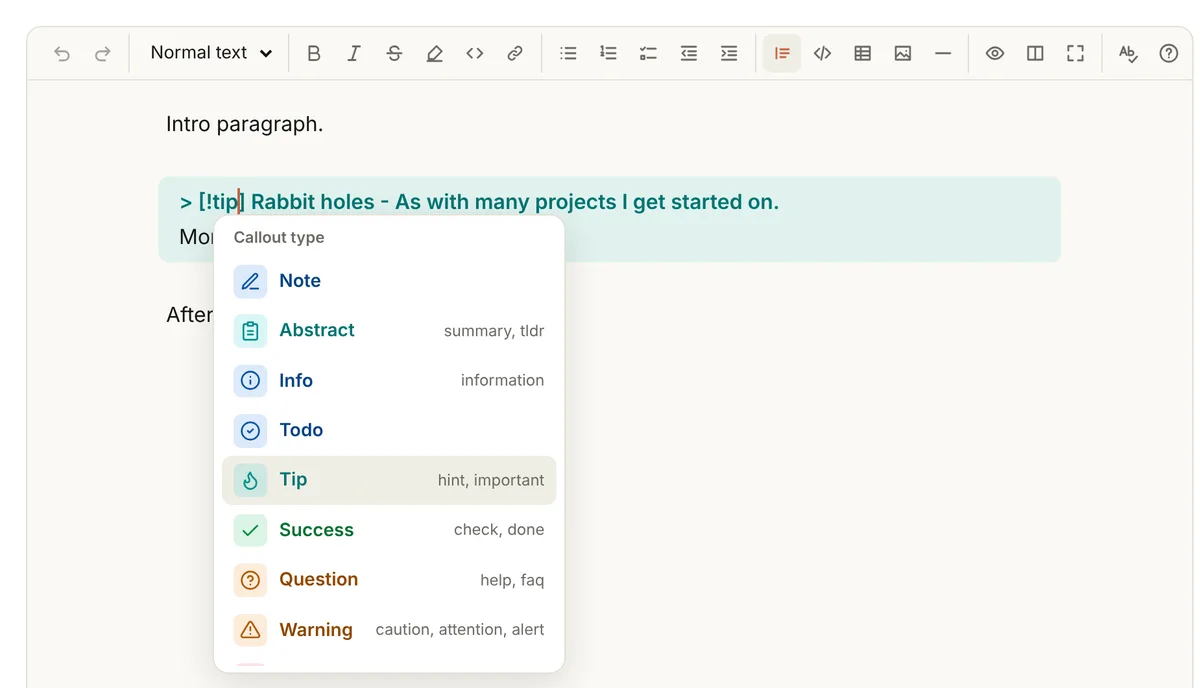
To change the type, click the callout’s icon, or put the cursor on its type, and pick another from the list. The types you’ll use most in a project:
| Type | Use it for |
|---|---|
[!note] |
Something worth knowing |
[!tip] |
A way to save time or get a better result |
[!info] |
Background or extra detail |
[!warning] |
Something that could go wrong: check this first |
[!danger] |
Something that could hurt you or break a part, such as mains power or a LiPo battery |
[!success] |
How to tell a step worked |
[!question] |
A common question and its answer |
Add - after the type (> [!info]- Full parts spec) to make a callout that starts folded, so long detail doesn’t get in the way.
Publish it
A new project is private: only you can see it (the editor calls it v0 · not published yet). When you’re ready:
- Check the Project completeness box in the corner. It lists anything missing, such as a cover picture or a difficulty level. Click an item to go to it.
- Click Preview at the top to see the page as readers will.
- Click Publish. Your project becomes version 1 and appears in the Projects Hub and on your profile.
Publish, then keep working
After publishing, the editor works on your working copy. It still saves as you type, but readers keep seeing the version you published, so a half-finished change never shows on your page.
- An amber Unpublished changes label appears beside the save cloud once your working copy differs from the live page.
- Publish changes puts your working copy live as the next version (v2, v3 and so on). You can add a short note saying what changed; only you see it.
- The versions drop-down (
Working copy · v3 live ▾) lists everything you’ve published. View opens a version, Compare shows what changed (added words in green, removed in red), and Restore copies it back into your working copy. Your current work is saved first as an unpublished version, so you can always get back to it. - Discard unpublished changes on the live version takes your working copy back to what readers see.
- ⋯ → Unpublish takes the page off the site. Your versions are kept, and you can publish again any time. ⋯ → Archive project hides it from the hub and your profile but keeps the page working by link.
Readers never see your working copy or version numbers, only the date you first published and the date of the latest version.
Ready to start? Create a new project or browse the Projects Hub to see how other makers write theirs.